
This was supposed to go up Wednesday but work & life has been crazy. My bad.

Last week there was a lot of ground work laying. All sorts of little things that don’t look like anything but need to happen before bigger, more visually impactful things can happen.
Also, there was a lot of shopping. The very expensive, slabby gorgeousness kind of shopping. And then there was a trek through the less glamorous world of LED under cabinet strip lighting. Woof! That is an overwhelming swirl of options. The more I think I know what I want, the harder it seems to nail down.
Since you all were so helpful with the faucet situation (which has been mostly worked out), maybe you can help me whittle down the LED strip options. I’m looking at:
- Armacost’s 120 LED/meter
- Inspired LED’s Ultra Bright Flex Strips
- FlexFire LED’s Hybrid Bright White/Warm White LED Strip
- LED Wholesalers Double Density Strip
- Or this adjustable cool/warm LED strip
Lots of light. Dimmable. Not too cool. Not too warm. Not crazy expensive. I’d like to use a dimmable power supply, so I can operate them off a Lutron dimmer in the wall. Suggestions?
Now onto the fun stuff.
WHAT I ACTUALLY DID THIS WEEK
DUN duh DUNNNNNNNNNNNNnnnnnnn.
This weekend…. oh man. THIS WEEKEND.
Dad came up and it is AMAZING what you can do with an extra set of hands. Especially an experienced set of extra hands.
We went from this –

to THIS –

Booyah.
That my friends would be a soffit all.buttoned.up.
WHAT?! WHAT????!!!
I know.
Do you know?? Do you realize what that means?
That means:
- ALL of the electric has been figured out, finalized, and run
- the can lights have been installed
- the electric & box for the pulley outlet above the island is in
- the duct work for the exhaust hood has been routed, installed, and sealed
- EVERYTHING BEHIND THE WALLS IN THIS AREA IS DONE
Is the excessive use of capital letters ADEQUATELY CONVEYING MY EXCITEMENT???
This, my friends, is huge.
Installing that single sheet of plywood has literally been in the making since I broke the tub drain back when I was renovating the 2nd floor bathroom.
Which would put us well over the 2 year mark for me having a hole in this part of the kitchen ceiling. I know.
I walk into what-was-formally-and-soon-will-be my kitchen and, for the first time since January 2012, I don’t see the underside of the upstairs bathroom floor. It’s shocking. And spectacular.
So what did it take to finally push things over that magic little threshold?
Well first, we installed a junction box for the pulley electric.

“Pulley electric? What is this ‘pulley electric?'” Let me explain.
The pulley electric will be an electric outlet on a retractable pulley that hangs over where my rolling island will soon live (mostly).
The thought was – it might be really nice to be able to use my mixer or electric griddle on the island without having to run extension cords which the dogs & I would (invariably) run into. And therefore bring anything that was plugged into it down to the floor with a crash.
To avoid crashing pans of hot oil, the concept for my pulley electric was born.

Also, the old track light fixture used to hang on a box in this hole and I really didn’t want to have to deal with patching it. The hole didn’t line up with where I wanted the recessed lights though, so I had to come up with another solution. Making use of an already existing hole for some added electric seemed like a win-win.
(Yes, I hate spackling so much I crafted a use for this hole mostly because I didn’t want to patch it. It happens to be a pretty ingenious use, if I do say so myself, so lets just pretend it was 100% intentional.)(Which we both know it’s not.)
There was one small, tiny, little problem (of course; nothing is ever simple). The track light wasn’t mounted into a “box” so much as it was held up with paint and PFM (pure f*cking magic). If I am going to be pulling on this cord every day, the pulley electric needed to be in a box that was mounted properly and could take daily tugging. (that’s what she said.)(is that even funny anymore?)(of course it is) The last thing I need is to pull on the cord and bring down my entire kitchen/dining room ceiling because I didn’t mount this box properly.
Everybody likes a properly mounted box. (chortle)
To start, we cut down a box hanger that would span the two joists. The box hangers at The Depot only shrink down to 16″ and there’s 8.5″ between the joists in this bay.
Some tin snips made short work of cutting the two pieces down. Then came the tricky part of screwing the box hanger into the joists using only the 4″ opening for the box.
Luckily, over the years, my tool collection has expanded to include a right angle driver and a flexible shaft attachment. Since the hole was much too small for the drill driver, these attachments made it possible.

The existing hole only needed a little tweak before the box fit like a glove. Pretty easy for such a tight box.

Honestly, this could have been way more of a headache, so I’ll take the little victories whenever they come.
After the pulley electric was secured, we moved on to the range hood ducting.
DUN duh DUNNNNN.

This involved finding the center line of the stove opening and pulling up the spec sheet for the range hood. The spec sheet showed that the duct work needed to be 1/2″ to the left of centerline.

Then it was just a matter of tracking that point straight up the wall. Yay levels.
Once we knew where the centerline of the exhaust duct needed to end up, it was a matter of tracking back over to meet the ducting we had previously installed above the fridge.
A few sheet metal screws to hold it all together.


And some goop to keep the joints air tight and some strap hanger later –

TA-DAAA!!!

Ready to exhaust whatever I inevitably burn. YAAAAAAAAY!
This kitchen never had an exhaust hood actually vented outside before. Getting it around all the plumbing and sistered joists of the upstairs bathroom was a trick. But we did it!

After the duct work was done, we pulled a few extraneous wires Dad & I had run but no longer need. No sense in keeping them in the walls if they won’t be hooked up.

Then it was time to cut a hole in some plywood and button her up!
I chose to put 3/4″ plywood (as opposed to drywall) on the soffit because I wanted a solid, secure surface to mount things to. Along this wall, directly under this soffit are going to be 3 – 36″w x 15″h x 24″ deep cabinets. Like this –
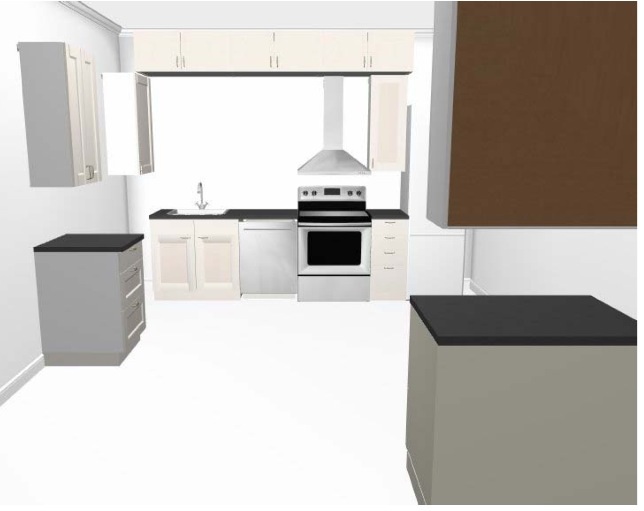
IKEA sells these cabinets to use above refrigerators but I’m going to use them to create a row of soffit cabs. They’ll be filled with seasonal and party supplies, like the galvanized tubs I only bring out to put drinks in at parties. I’m not worried about getting into them every day. Since I have the height here (the ceilings are just under 10′ tall here), I might as well use that vertical space for storage.
Anyway, because the soffit (refrigerator, according to IKEA) cabinets are a generous 24″ deep, I plan to fill them with LOTS and lots of stuff. Hanging 3 boxes stuffed with 7.5 cubic feet of stuff (each) 10′ in the air off a single back rail with 2 tiny little machine screws into the sides of the cabinets makes me more than a little nervous.
I want to provide support in the front. I’ll use the same metal hangers IKEA puts in the back of the cabinets but mounted on the sides through the top of the cab instead. Through the top of the cabinet and right into THIS FABULOUS 3/4″ PLYWOOD.
That I have. Mounted on my ceiling.
Basically, this means I can almost install the upper cabinets. HOL.Y.CRAP. I never thought that day would come.
WHEEEEEEEEE!!!!!!!!!!!
Sarah’s making some pretty kick butt progress on her tiling. She’s a fiend. Go check out everyone else who’s linking up too. It’s so fun to see everyone’s progress. 🙂


Absolutely amazing. I love your ingenuity and sheer determination, cheers
Wow! That’s some serious work. That sheet of plywood must feel like some real forward progress. Funny how small things can make such a big difference after living with an opening for so long.
That is really exciting!. Cabinets. Here they come!
I’m not linking up this week because most of my work was the invisible prep work that’s only noticeable to me. I did, however, manage to finish the cover for my exposed heater in the room. Much like your exposed bathroom floor, this has been flashing it’s ugly self at me for nearly two years and I’m amazed at how much I love seeing the new cover, even in it’s still unpainted state. Yay for progress! Can’t wait to see what you’ve done next week. Keep it up!
That’s what she said’s are absolutely still funny. Oh and fanf*ckingtastic on the work this week!
Oh and I need an update on the faucet. Stat.
You made me snort out my coffee girl. Somedays I feel like I’m held up by PFM. Shine on!
Thank you for inventing PFM. I shall now use it for absolutely every iteration I can think of.
Congratulations! very exciting 🙂 I love your idea of using that height for seasonal/party supplies, they’re always cluttering up my cabinets. One day I’ll get that dream kitchen 😉
Pingback: Kitchen: Up, Up, & Away! |