Wanted: Kitchen Sink

I had no idea kitchen sinks cost so much.

We’re trying to be as cost-conscious* as possible in renovating our garden apartment. The stove & fridge were purchased (separately) from Craigslist for $275 total. The cabinets were free and, while they could use a good coat of paint, they’re solid & well made. Left on the list of things to buy are a kitchen sink, faucet, upper cabinets (or maybe shelves) & counter top.

I’ve been browsing online and keeping an eye on craigslist but no luck yet. Perhaps it’s because we need an odd size or maybe I’m just picky. Either way, I didn’t expect to pay more for a sink than I did all the appliances.

Here’s what I’m looking for:

~ top-mount
~ no more than 16″ wide
~ no more than 20″ long
~ not picky about depth
~ ideally, less than $100 but hopefully, less than $200

not this sink

Guess this whole “home owner” thing comes with a bit of a learning curve.

* I am looking to purchase quality, well-made materials that will last. Often times, you get what you pay for and I’m not interested in wasting money just to do it over. I’m frugal, not cheap. That said, I’m not above 2nd hand items that are still in good shape. It’s a shame when perfectly good items end up in a landfill.

Posted in garden unit, kitchen | 5 Comments

Space vs. Historic Accuracy

I’m taking a break from thinking about our garden apartment for a day because I’m currently preoccupied with our 1st (aka parlor) floor.

While we were at the house ripping out drywall Monday evening, we met a couple of our neighbors. (They’re very nice, by the way.) The gentleman had actually spent years restoring the rowhome 2 doors down and he invited us in to take a peek. It was BEAUTIFUL and he let me take some pictures. What caught my eye most what what he did with the front room on the first floor.

All the houses in our “row” were built at the same time and, originally, had the same floor plan. Over the years, owners have changed and updated things. We’re lucky that most of the original historic details in our home are intact, as is the floor plan.

Currently, our 1st/parlor floor looks like this:
1st floor current layout

There is a wall between the hallway & living room with an arch:
DSC_0664

DSC_0663

(please excuse the stuff, these pictures were taken before we moved in)

DSC_0294

DSC_0295

DSC_0296

The home 2 doors down doesn’t have that wall. There is no hallway; you walk in from the vestibule (which they’ve added; ours doesn’t have) into the living room:
DSC_0427

The home also didn’t have much of the original detailing intact, but our neighbor renovated it to look like the original period. The gentleman is also quite the woodworker, as can tell by all the details and paneling he’s added.

DSC_0426
(Beautiful, isn’t it??)

This got me thinking about ripping out OUR wall. We would keep our current crown moldings intact, removing the wall below them. We would loose the arch & baseboard moldings.

In our home, the floor plan would look something like this:
1st floor no wall layout

The front room becomes much more open. I’ve never been a fan of hallways and typically prefer as few walls as possible. However, we loose an original arch and a wall that could be filled with art or furniture.

Basically it comes down to opening the space up or keeping the house true to it’s original floor plan.

What would you do??

Posted in 1st floor | Tagged , , , , , , , , | 17 Comments

How to Remove Drywall

Yesterday after work, the hubs & I ripped out all the drywall in the basement garden apartment kitchen. Why?

1. The gas line to the stove was not secured and flexing freely
2. Electric outlets could have been placed better
3. It was G-ROSS

You may remember what it looked like at the begining.
DSC_0331
yum. (eyeroll)

After Saturday’s major demo, it looked much better.
DSC_0119
DSC_0118

But still not quite ready for prime time.

If you’ve never removed drywall before, it’s really quite easy. Here’s how:

1. Using an exacto knife/box cutter, cut the drywall around the edges of where you want to take out. We only wanted to take the back wall out but leave the ceiling and side walls intact. Here you can see our slice in the corner.
DSC_0309

2. Wearing proper safety attire, use hammer/sledge/crow bar to make holes in said drywall. Be VERY careful to avoid gas or water pipes and any potential wiring.
DSC_0313

I SAID, “wearing proper safety attire.”

DSC_0345

That’s better.

3. Using your stategically placed holes as hand grips, PULL. Hard.
DSC_0318
DSC_0325
Keep pulling!
DSC_0326
DSC_0332
Until it rips or breaks off.  Then let it fall to the ground with an incredibly satisfying THUD.
DSC_0334

4. Show pile of drywall who’s king
DSC_0350

5. Fill multiple trash bags with debris
DSC_0367

6. Break out the brand-y new shop vac and suck up all the dust & little bits.
DSC_0376

While the dog watches and wonders what Daddy is doing.
DSC_0393

7. Have a mini-photo shoot with your latest new toy.
DSC_0389 DSC_0395
DSC_0396 DSC_0390

8. Admire your handy work!
DSC_0365

All done!!

Posted in garden unit, How To, kitchen | Tagged , , , , , , , , , | 18 Comments

Want your grandma’s bathroom??

Today we went out browsing for shower surrounds. Always wanting to patronized local, independent businesses, we stopped at 2.

First we stopped at Lafayette Hardware (135 Lafayette St). They had a nice selection of paint but no surrounds. We tried to swing by Continental Trading & Hardware’s at 190 Ferry St. but, being early on a Sunday morning, they were closed. We headed to their main – and much larger – location at 400 Delancey St.

First impression: they have an excellent selection of pavers and exterior finishes. It’s a very large store. We were directed to the bath section for shower & tub surrounds. Found a couple corner shower set-ups but, alas, nothing we needed.

While we struck out on surrounds, we did find a few things I was positive were no longer made.

Behold, all the matching ceramic bathroom fixtures your little heart could desire.
DSC_0008

Mauve soap dish? Check.

Matching towel rack with designer acrylic bar?? Double check.
DSC_0009

But what’s this?  You want to match your powder blue tub, you say?? But of course!

A powder blue soap dish paired with the matching tooth brush holder would be perfect for above your sink!
DSC_0012

And clearly you’ll need the matching toilet paper holder.

DSC_0010

And if you’re buying the powder blue toilet paper holder, you absolutely must go for the matching toilet!
DSC_0018

And while you’re at it, why not throw in the powder blue bidet? It’ll keep you squeaky clean and you wouldn’t want to break up the set.

It’s ok; I know this is exactly what you were hunting high & low for. No need to thank me.

Posted in bathrooms | Tagged , , , , | 11 Comments

Basement Demo Day

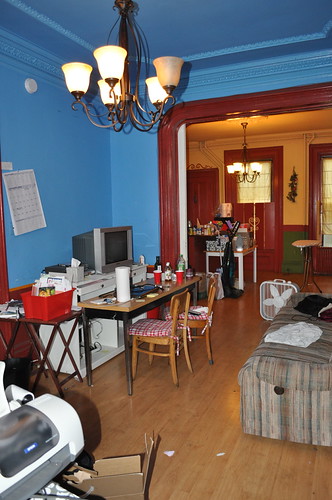
The basement of our brownstone (can you call it a brownstone if it’s brick?) is zoned as a separate unit; separate electric meter, separate gas meter, 2 different points of egress, the whole nine yards. Unfortunately, it’s not what one would call “habitable”.

The kitchen is delineated by a couple cabinets covered in a sticky, dark brown goo
DSC_0332

peeling wallpaper (also splattered with said sticky goo)
DSC_0338

water plumbing stuffed with gauze
DSC_0707

gas lines stuffed with some other mystery white fabric
DSC_0708

Have you barfed yet? I did. A little. In my mouth.

I believe I already showed you what was passing for a bathroom. But, just in case, I’ll show you again.
DSC_1122
(That gray stuff behind the plunger is steel wool stuffed in the wall. By the number of rat traps & poison we found, it’s probably to try and keep the little suckers out.)

Yum.

Today, my friends, all this changed! The “Family Team” (aka: our parents) came up and the 6 of us took the basement by storm. Before we go any further, I must say that we have THE BEST family in the world. We could not do this without their help and expertise.

We started in the kitchen, unscrewing the doors and taking the upper cabinets off. The wallpaper peeled off in whole sheets; no steaming required. The one base cabinet was next.
DSC_0013

You can use your imagination for what we found under the cabinets.

DSC_0015

DSC_0018

Meanwhile……

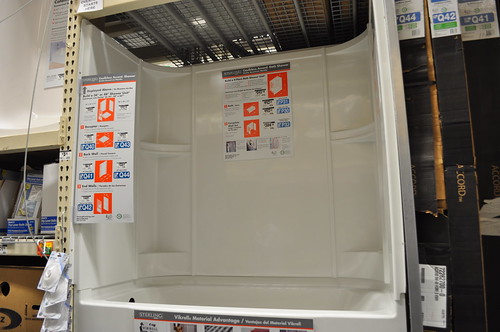
The hubs & his dear father worked in the bathroom; popped the surround off,
DSC_0036

pulled out the medicine cabinet & vanity,
DSC_0199

and removed the tile,
DSC_0027

Want to hear something REALLY gross?? Good. Cause I’m going to tell you.

My dear husband’s father removed the lower parts of the dry wall around the tub because it looked moldy.
DSC_0107

At the foot of the tub, on the INSIDE of the wall, look what we found:
DSC_0108

Need a closer look??
DSC_0110
Those would be scratch marks.

INSIDE the walls.

Guess that steel wool, rat poison, & sticky traps weren’t just for show.

:-O*** * *   (that’s my emoticon for ‘barf’)

And, in case you were wondering, linoleum is a P.I.T.A. to get up. We tried several tools but found the putty knife/scraper was the way to go.

(before)
DSC_0819

(after)
DSC_0206

The nice thin blade was the only thing that got under the top layer. Even then, it left most of the adhesive backed lower layer behind (that’s the white stuff, gray is concrete).

(kitchen before)
DSC_0004

(kitchen after)
DSC_0210

We aren’t going to worry much about scraping ALL the way to the concrete. Frankly, what’s left of the plastic is not coming up and it’s evening out the floors. Therefore, it can stay.

Besides the kitchen & bath, we removed the cabinets/bar so that our tenant has some place to put their clothes.
Before
DSC_0840

During
DSC_0083

After
DSC_0116

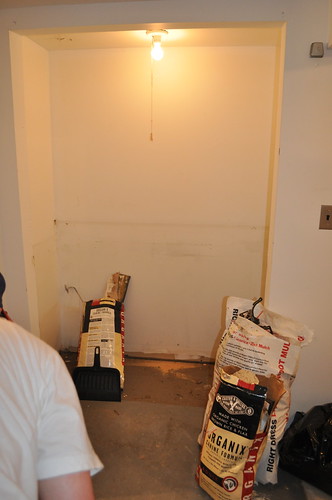
There’s also this weird fireplace-y thing built out into the room.
DSC_0813

We drilled a whole in the left side. That way we could peak inside and see if we really wanted to tackle whatever was behind the drywall. We saw brick, an old fireplace that had been covered over, and a lot of wood.
DSC_0048

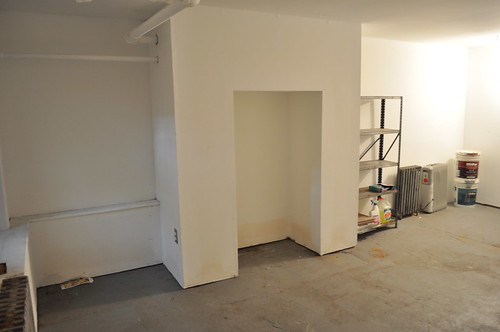
We decided to go for it, rip all the drywall off and see what we really had to work with.
DSC_0057

DSC_0139

I know it looks worse now but we have a plan that will actually add about 8″ back of usable floor space.

All in all, we got a lot accomplished.

DSC_0201

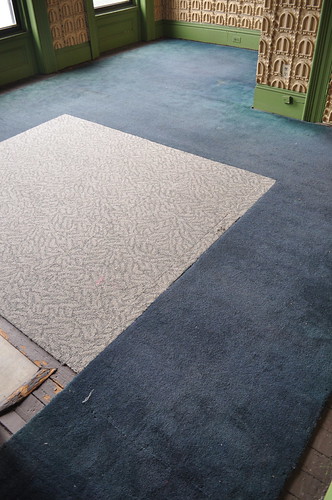
Also, a there has been a development regarding the flooring situation. We have decided to tile the bathroom and paint everything else.

After spending the better part of the day on my hands & knees scraping up linoleum, I wouldn’t wish that on my worst enemy (well, actually I might) (but I certainly wouldn’t want to do this again). Therefore, we will not be laying any kind of vinyl or linoleum. I’m thinking a nice light color, instead of the current garage gray.

DSC_0184

DSC_0176

We’re getting there!! How do you think we did??

Posted in bathrooms, Floors, garden unit, kitchen | Tagged , , , , , , , , , | 13 Comments

Carpet, Be Gone!

Today was the first day something productive was done at the house. It was also the first time I realized just how.far. we have to go. Sure, it looks like it needs work when you scan the room. But then when you look, actually look at the details, you realized e.v.e.r.y.t.h.i.n.g. needs work, if not a complete renovation. For example, today I saw one of the feet on the claw foot tub is completely unattached. Add it to the list. We have a long way to go.

Today I took the first itty-bity baby step. While the carpets on the 2nd floor weren’t in bad shape, we would like to refinish all the floors. Yes; all of them.
DSC_0682

DSC_0675
(2nd floor front/future craft & guest room)

We could pay someone to rip these carpets up for us. Or I could spend a Friday afternoon, get a bit sweaty and do it myself.

DSC_0701

DSC_0732
(2nd floor back/future TV room)

Before I got started, I had high hopes of what I’d find. You always hear people pulling up carpet only to find glistening hardwood that had been protected for years.

DSC_0735

This, unfortunately, was not so.

It wasn’t difficult to pull up the rug; the edges were all nailed down with little spike nails.
DSC_0739
Grab an edge or corner and they just popped up.

Tools I Found Essential:
DSC_0785
Robo-grips: very helpful in pulling the carpet up over stubborn nails
Packing tape: once the carpet is rolled up, a few turns of tape kept things closed
Utility knife: for cutting the carpet into manageable strips
Gloves: for protecting my manicure
(Who am I kidding; I don’t get manicures.)

The floor in the front room was painted dark brown; which we already knew because the carpet didn’t go to the edge. The condition was about what I expected.
DSC_0740

After ripping everything out, I realized a shop vac would be completely clutch. Check out that dust! Gross.
DSC_0748

Guess we’ll suck it up later.

DSC_0747

DSC_0750

The back (future TV room) was carpeted wall-to-wall.
DSC_0702

I think it actually may have looked better carpeted. Yikes.
DSC_0752

On one hand, the lack of paint means they’ll have to sand less before hitting actual wood.
DSC_0758

On the other, the area to the right of the fireplace is in rough shape. It looks like it’s been patched.
DSC_0764

The wood near the marble is completely rotted.
DSC_0766

We’re having John, a floor refinisher, by tomorrow to take a peak. We’ll see what he says.

DSC_0803

All done!!

Do you have any experience with refinishing floors? Tips or tricks? Please share!

Posted in 2nd floor, Floors | Tagged , , , , , , | 9 Comments

Starting a Project!

Bonus Friday morning post.

I’m finally going to start doing stuff, instead of just indecisively yammering on. Today, the 2nd floor carpets will meet their maker.
DSC_0998

DSC_0677

Grossness Be Gone!!

Hoping to find the hardwood in good condition. Fingers crossed!

Posted in 2nd floor | 1 Comment

Flooring or Paint?

I’m back to penny-pinching but this time NOT in the basement bathroom or in reference to tile.

Earlier this week, I tossed out some solutions for the floor in the main living area of the basement. I read everyone’s comments (thanks commenting, btw!! It makes me feel special.). You guys really got us thinking.

We’ve decided not to jack hammer out the floors. It’s too much work for a space we’re not living in. Not that we don’t want our tenant to be happy and comfortable; we totally do! But we’ve recently learned that a woman lived down there very comfortably for about 20+ years before the previous owners took possession of the property (or so we’re told). Guess it can’t get that frigid.

I’m sick of talking about tile, nor do I care to level the concrete in a space this large. (Excuse the lame pic; I haven’t taken any since we closed.) The space is larger than is shown here but it gives a decent representation of the space.
DSC_1113

If you had talked to me Monday, I would have told you we were painting the floors and calling it a day. And we still might do that. BUT. . . While we were at Home Depot looking for tile, we spent a significant amount of time perusing the vinyl flooring section.

DSC_0410
Mmmm… glueless….. (DuPont, style: Aspirations, design: Hickory Ridge, color: Sable, price: $2.99/sqft)

You can’t really tell from the picture, but it’s totally flexible!

DSC_0402
(Armstrong, style: Chamblis, design: Wildwood, color: Warm Brown, price: $1.97/sqft)

It comes in 12′ widths, which is perfect for our 11′ wide space. We can roll it out with no seams.

DSC_0421
(Armstrong, style: Commission Plus, design: Echo Lake, color: Spice, price $1.97/sqft)

This stuff (below) was the cheapest at $0.88/sqft!
DSC_0444
I didn’t think it was awful but the hubs said it looked cheap.

While I gravitate toward darker woods (if it wasn’t already obvious), it is a basement space. I think a lighter floor would make it seem more open & spacious. Possibly something like this??
DSC_0456
Also $0.88/sqft. Cha-CHING!

And then there were the flexible options that came in stick-together strips (so you almost feel like you’re laying a real hardwood floor). (Except by “hardwood,” you mean totally fake plastic). Averagely priced, if not slightly more dusty:
DSC_0447
(at $1.79/sqft)

DSC_0418

The strip method (get your mind out of the gutter!) seems like it might be an easier installation. What? Wrestling a 12’x20′ piece of plastic doesn’t sound like fun to you??
DSC_0450

So now we’re down to 2 choices: Vinyl Flooring or Paint. If we choose vinyl, it would probably be glued straight to the not-completely-level-concrete. But because it’s already flexible, I don’t think it would be a huge deal. If we paint, we’d probably go a lighter color but I’m looking for suggestions. It would be up to the tenant to provide area rugs (should they want them).

What’s your vote (vinyl or paint)??

Posted in Floors, garden unit | 18 Comments

Tile or Surround??

Monday we continued the search for basement floor and bathroom materials. We have the basement bathroom floor figured out (thanks to the awesome FREE tiles from Dad #2) but are still discussing what to do with the shower walls and the floor in the main living area.

We went to Family Tile and Home Depot (both here in Newark. Family Tile had an impressive selection of glass tile, which we really liked but not for a bathroom we’re not living in. I think we’ll go back when it’s time to do a kitchen backsplash or bathroom that we’re actually using. None of their $0.99 sqft tile matched our free tile, so it was off to Home Depot.

We found another stock vanity that we like better than the one at Lowes.
DSC_0465

I like how the doors go all the way up (the other one didn’t) but more importantly it’s only $74.

 DSC_0464

If you’re a math whiz like me, you know $74 is better than $98. Add that $24 back to the budget. Woot!

We also found this light 2-pack:
DSC_0462

They’re basic and inoffensive. I was thinking one for the bathroom, one for the kitchen.
DSC_0461
And 2 for $15.97 works well with ye-old-budget. The bathroom doesn’t have a window though, so we might need something that vents. Maybe?

Shower: Tile or Surround?
We’re not sure where the access to the shower plumbing is. If we have to go in through wall, a plastic shower surround would be easier to pop off than tile, if (God forbid) we have to fix something.
DSC_0473

According to our blueprints, the tub is an odd size and the surrounds we found were too short. Of course, there’s a very real chance the blueprints aren’t 100% accurate. We will remeasure before making any final decisions.
DSC_0471

If we tile, I’m liking basic white. Home Depot had a good selection that were within budget. (I was originally thinking subway tile but they’re seem to be more expensive that the basic square stuff.)

The cheapest basic white at Home Depot is the 12×12″ at $1.09/sqft.
DSC_0481

We’re doing 13×13″ on the floor, so they’ll look about the same size visually. But because they’re different colors, I’m concerened that it’ll look weird.
DSC_0480

For $1.28/sqft, we can go with the 4.25″ x 4.25″ white ceramic.
DSC_0476

They’re a little bigger than you see in traditional bathrooms, which I like. The price is within budget, so they may be just the ticket.
DSC_0475

I don’t think we’ll get fancy and do a decorative border but I am toying with the idea of laying them on the diagonal.
DSC_0489
Or maybe lay the floor on the diagonal and the shower horizontal? I think having both the floor and the shower on the diagonal might be a much. Do you??

I’m also browsing Craigslist for tiles deals too. If you see any listings – or want to suggest a place to check out – around the greater Newark area, send the link my way. The price to beat is currently $1.28/sqft.

Posted in bathrooms, garden unit | 6 Comments

Basement Floor

Today we went to our local big box emporium to scope out bathroom supplies. The only things we’re keeping are the tub and toilet (although we will be getting a new seat). We found a white vanity for $98 that we think will work well but decided not to buy it.
Bathroom Vanity?
It wasn’t on sale, so we can go back whenever. We did come home with a few sample tiles for flooring but the trip was more of a fact finding mission, a baseline for comparison.

After brunch, my father-in-law found 28 13″x13″ tiles in his shed. They’re leftovers from his big outdoor kitchen project and a nice neutral beige (Keyera Beige, to be specific).
Backyard Kitchen
(Picture by my father-in-law, who built that whole thing himself. props to that!)

Close-up of tile (which is darker under inside light):
Basement Bathroom Floor Tile 2

I think there’s enough to do the floor and the price (FREE) is perfect. But finding bathroom floor tile led to a larger discussion about what to do with the basement floor.

The basement floor is concrete with linoleum on top in the “kitchen” and square white tile in the bathroom; neither of which are staying.
DSC_0709
(Is it weird that I get some twisted sort of amusement from posting these disgusting pictures??)
DSC_1117
The concrete is uneven; more so in some places than others but uneven nonetheless. We’ve discussed some options and, if you have any other ideas, I’d love to hear them.

Our Options:
1. Jack hammer out all the concrete, excavate a foot (so we get 8′ ceiling height), install radiant heat throughout, and repour new concrete. Install whatever surface floors we want in the various areas. (We share a furnace with the basement apt. Radiant heat is incredibly efficient and would keep things at a nice even temp throughout the winter.)

2. Pour a new skim coat on top of the existing floors to even things out and just deal with the 7′ ceiling height.

OR leave the floor as-is, install the needed backer board and tile the kitchen & bath (cracked tiles stink!). In the main living area:

3. Lay carpet.
I think carpet would add a nice warm and homey-ness to a basement apartment. It doesn’t appear that we have water issues (water stains seem old) but, it is a basement rental, so I guess you never know what could happen to it. Of course it could be an indoor/outdoor carpet; easy to clean and not a huge issue if it gets wet.

4. Paint the floor and call it a day.
This is obviously the easiest and cheapest option. It will also be the easiest to clean after a tenant leaves. I’m worried that it’ll seem to cold and basement-y but I suppose the tenant can provide their own area rugs.

Are we missing any options? What would you do??

Posted in bathrooms, garden unit | 13 Comments