
Our house was built sometime in the 1880’s (we think). Construction at the time was all about lathe smothered in horse hair plastery goodness. Lets start at the beginning.
If you were to look at a cross-section of our walls, you’d see they were created like this –

(image from RemodelGuide.com)
Over time, the plaster keys have broken off & so the plaster is basically floating on top of the lathe. In these areas, the walls feel kinda squishy. In comparison – the areas that haven’t separated feel rock hard. The squishy parts have mostly been around cracks; although not all cracks are squishy (which is good, because we have about 3,962 cracks).
When researching how to fix plaster walls, I found the following sites particularly helpful:
- NPS Preservation Brief 21: Repairing Plaster
- How to Repair Plaster Walls (from This Old House)
- How to Repair Plaster Ceiling (also from This Old House)
We chose to use plaster washers. Westfield Lumber sold them in packages of 25 although Kilian’s Hardware in Philly sells them for a good price online.
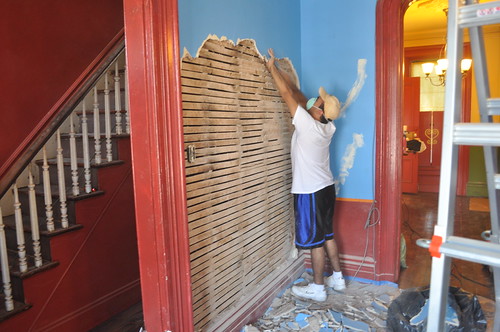
There were 4 areas we planned on using the plaster washers; dining room, parlor, master bedroom, walk-in closet. We didn’t get to the dining room during our last Work Weekend, so the success there is TBD. We tried them in the parlor with little success; ended up removing the plaster & replacing it with drywall.
The wall first looked like this.

We tried the plaster washers but the wall was still too squishy.

We decided to take out a section, which grew into a larger section. The lathe behind the plaster was split in some spots, which is why the plaster washers weren’t working. Then we decided to go up 4′ from the top of the baseboard because 1 sheet of drywall is 4’x8′ and would completely cover the hole.

That kinda worked. Except the plaster above our 4′ line wasn’t really in great shape either. So AJ helped us take it up another 8′.
Time for drywall.

Hanging drywall is relatively easy. We hung ours horizontally. Rumor has it horizontal seams are easier to hide than vertical seams.

Cut it to size & screw it into the studs. You can see the fellas snapping a chalk line to ensure they’d hit a stud.

Turns out the sheets were cut just a little short (oops!). Luckily it’s in the corner, so we hope it’s easy enough to hide. We’re going to cut a strip of wood to fill it in, then we can tape & putty over it.

It’s not quite done yet but we are well on our way.

I’m hopeful we can get it done and ready for primer this coming weekend. That’d be spec.tacular.
Thanks AJ!! Welcome to the Wall of Awesome.


You guys are doing some really great stuff.
Depending on the thickness of your moldings, if you have any more bad walls, you may want to consider saving the mess of the tear down and just covering the bad walls with thin (1/4″) sheet rock. You’ll need to add extenders to your electric boxes but usually the thinner dry wall works well for this.
Also, look at these “setbacks” as “opportunities” for running new wires (electric, cable, telephone) while the wall’s are open.
Good Luck
Pingback: Master Plaster « brick city love