Kitchen: Speaking Up About Laying Pipe

image

Fire be damned! The kitchen must move forward!! CHARGE!!!!!!!!!

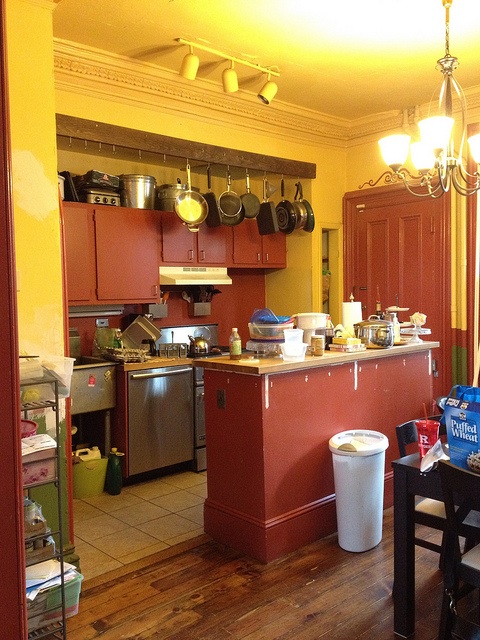
The tricky part about this kitchen renovation is juggling between the past and present. The project started in 2012 but here we are in 2014 and it’s still ongoing. I’m left torn between wanting to jump right in and show you where things are now. Which I kind of did a couple weeks ago. And wanting to show you what it has taken to get to this point.

Today, we are going to rewind to July 2012. Back when 6″ of cast iron pipe was completely ruling my world.

So annoying.

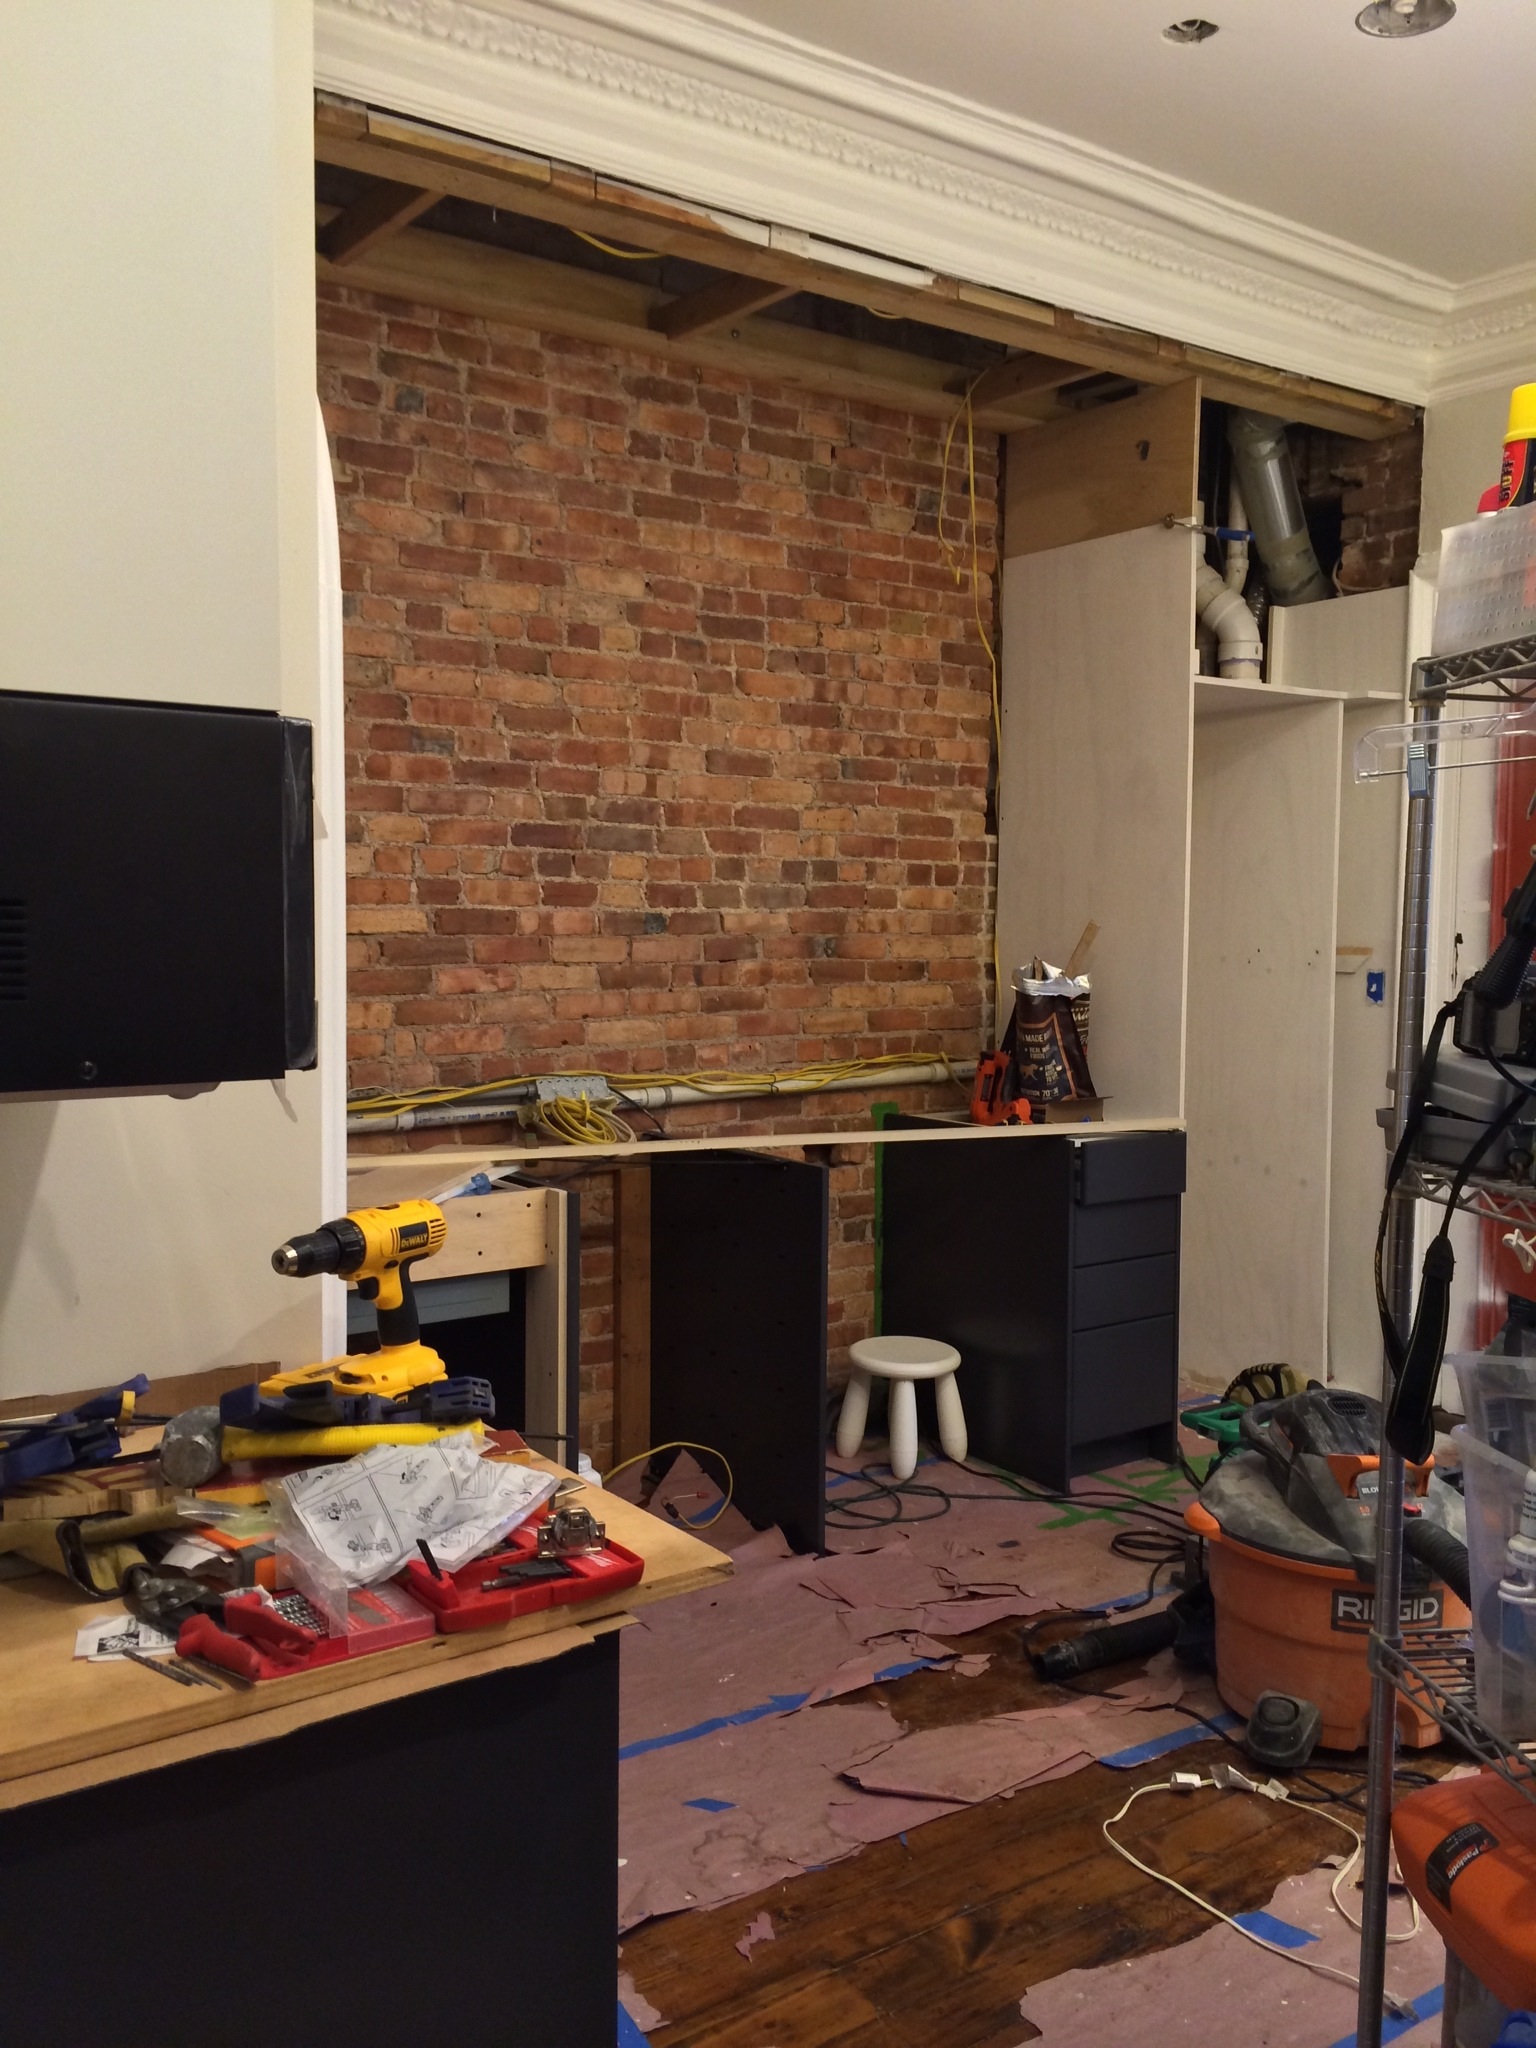
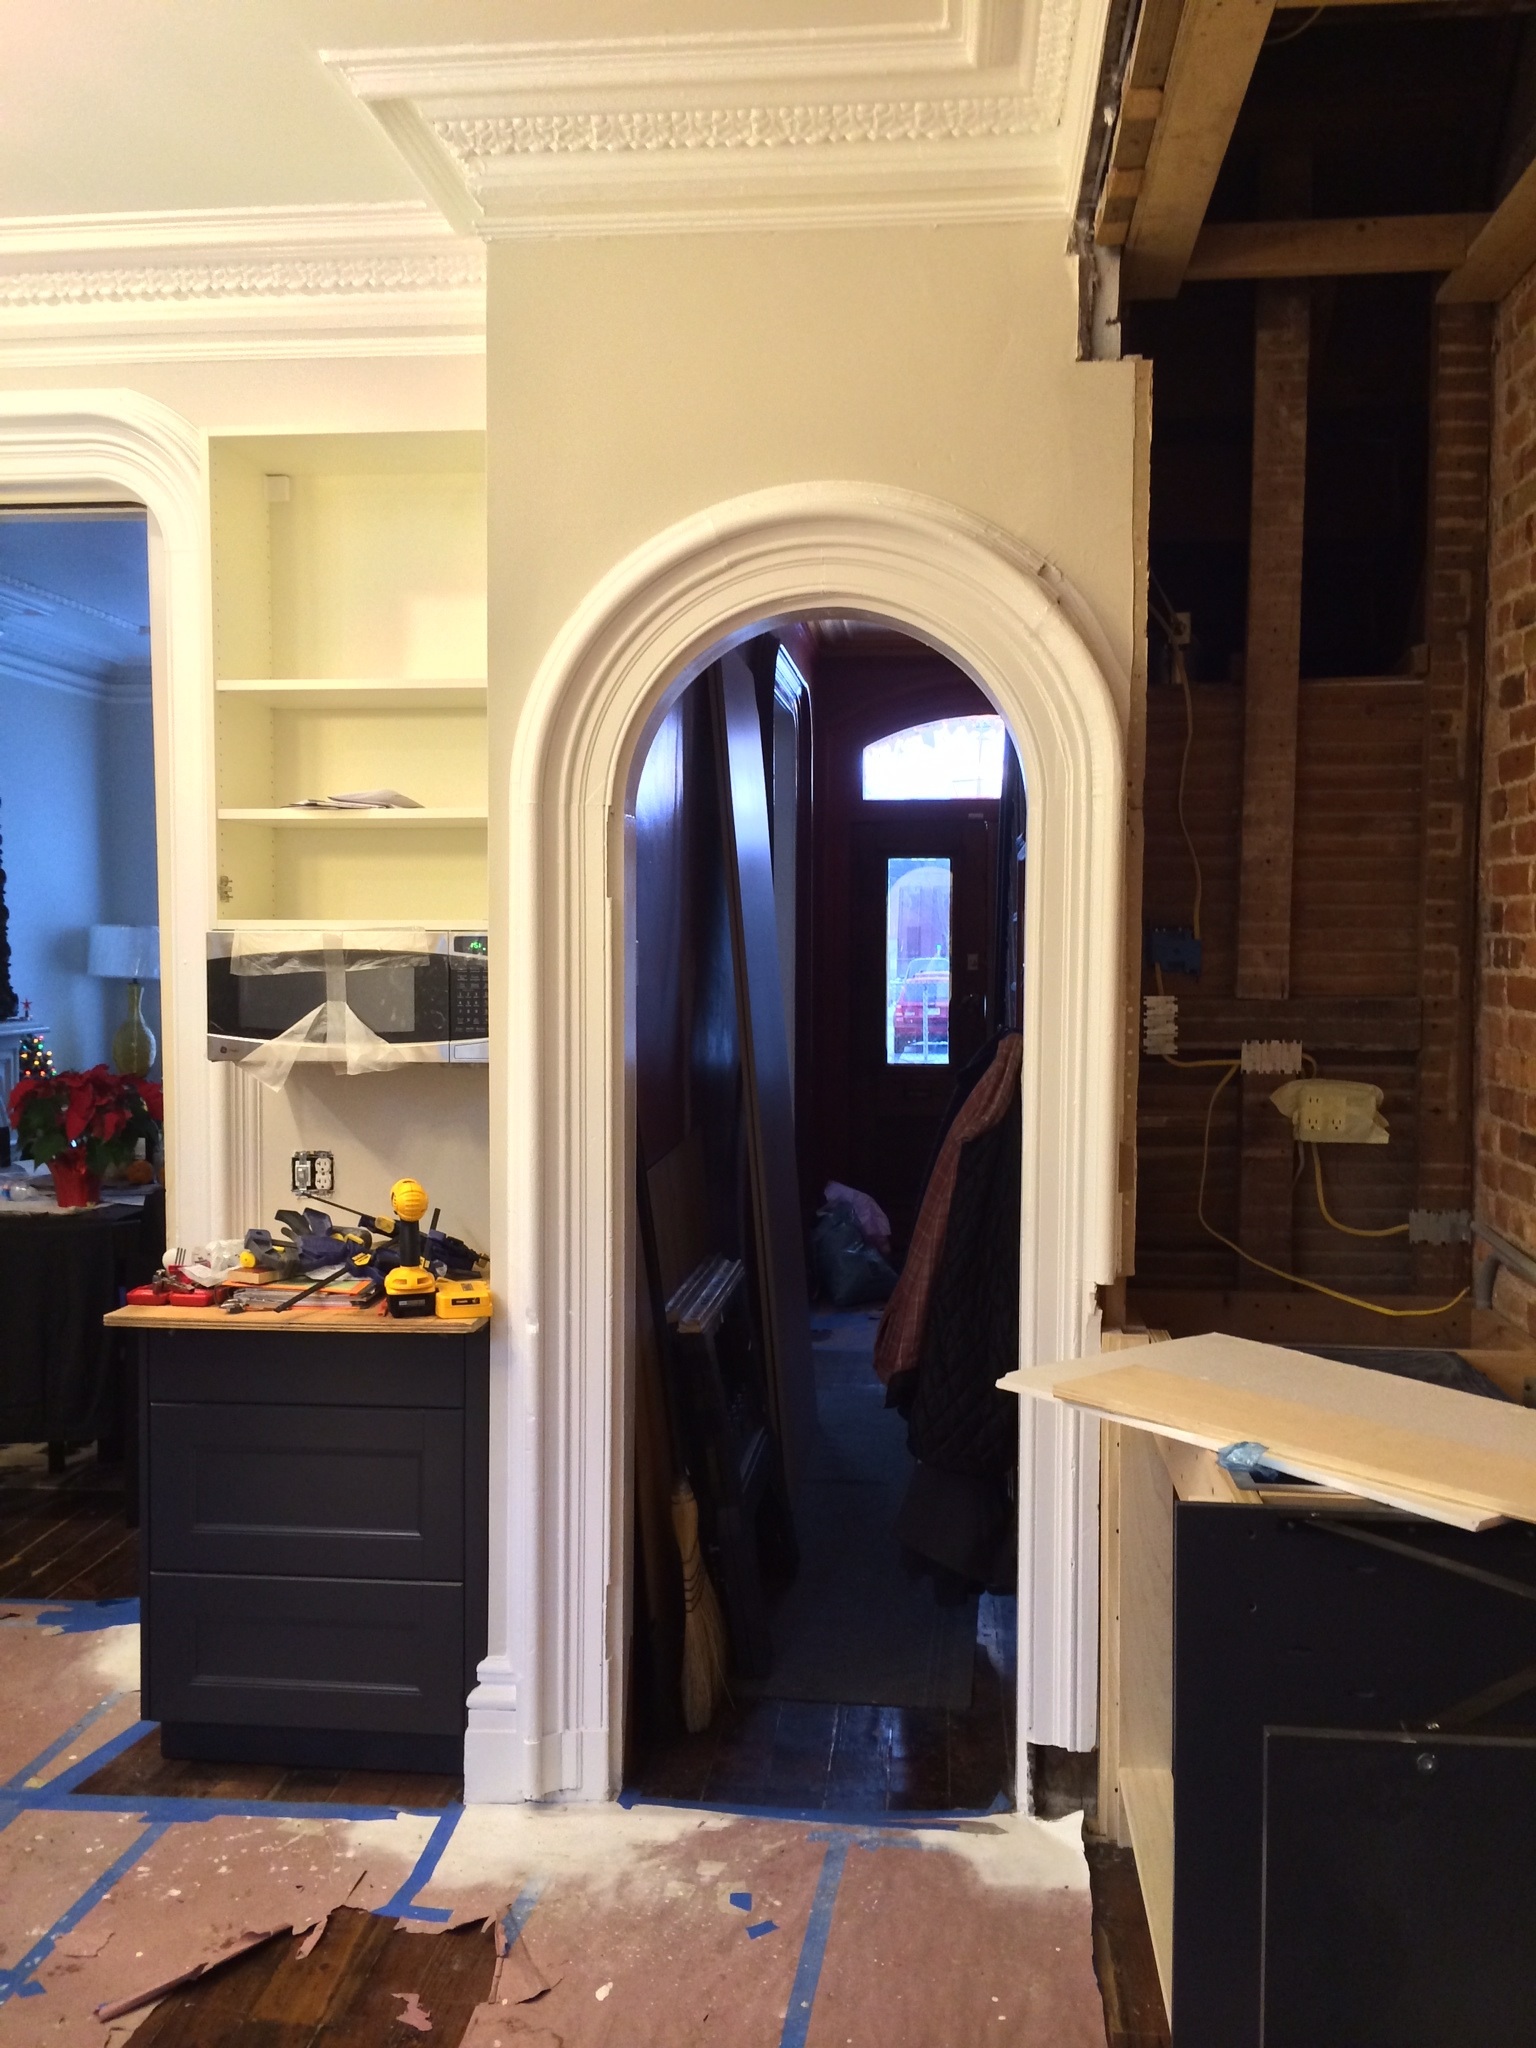
Before beginning demo, I knew the drain stack for the upstairs bathrooms went down this corner but that little 6″ elbow jutting out to the left was not part of my schematic. As I lamented a couple years ago, this messed with pretty much every part of the kitchen plan because it pushed the entire wall of kitchen to the left 6″. When you’re only dealing with 120″ of kitchen, that’s kind of a big deal.

After whining about it for a post, I decided to put on my big girl panties and call the plumber to move it. At the time, $500 felt like a huge investment to make in 6″. Looking back, this was one of those – duh, why is this even a question? – things.

The plumber came out and used one of these pipe crackers to crack the cast iron pipe. Not a DIY project. (Well, I guess it could be but these suckers are expensive.)

That was pretty cool.

I was hoping that he could ditch the useless T & maybe even get the whole stack back a little closer to the back wall.

Untitled


(The underside of the bathroom floor. You can see the joist we had to sister together.)

He mocked up the PVC pipe and installed it with rubber connectors at the top & bottom to the old pipe.

Untitled

Untitled

The pipe clamps tightened and, wham bam thank you ma’am, it was in.

Just like that.

They left and I sat there staring at it.

It just didn’t look right. The pipe looked a lot farther to the left than I expected it to and it didn’t look like I had gained all that much room.

So I measured. And I was right.

I only gained a couple inches.

Well crap. I just spent all that money. It wasn’t what I wanted. It didn’t turn out like I thought it would. Even worse – I told my plumber it was great. I told him I was happy with it. Now that he had left and I measured, I wasn’t.

I felt foolish. Why wasn’t I more clear with what I wanted and expected? Why did I say everything was perfect?

I sat on the floor, staring at this brand new $500 PVC pipe, and had my own private pity party.
And then I called my father. Mostly to whine.
And he listened. Like most fathers would.
And then he said what most normal, rational people would have just done from the beginning.
“If you’re not happy with it, call Mike (my plumber) and tell him. I’m sure he would much rather fix it so you’re satisfied.”

We hung up and I let my embarrassment linger for only a moment longer before kicking it to the curb and picking up the phone.

Now, before we go any further, I must say that I love my plumber but bedside manner is not his strongest of suits. He comes off as gruff and old school. His hands are calloused and seemingly permanently stained from decades of fixing things. He points out mistakes but offers solutions. He isn’t shy about telling you what should be done, how it should be done, and why. Even when he’s super busy, he always makes time for urgent calls (like when my boiler wasn’t working). He knows his clients and he’s fair. I like him (and wouldn’t call anyone else) but he can be a bit brusque.

“Mike? It’s Carrie. I know you JUST left but I’ve been sitting here staring at this pipe and it’s not right. I needed it to be further to the right.”
“I thought you said it was great.”
“I did… But it’s not.”

After far less grumbling than I expected, he turned around and came back.

At this point, I have NO idea how he’s going to fix it. I am not wrapping my brain around the twists and angles needed to get from point A to point B and still get the pipe to hug the back wall of the house.

The drain from the bathroom upstairs is a fixed point. The cast iron pip that continues down into the basement is a fixed point. And I want the whole thing to move to the right about 3″. I’d want to kill me too.

Mike came in. He stared and pondered for less than 3 minutes. Grumbled only a little.

“Because the top & bottom pipes don’t directly line up, you have to have this bend in it. Do you care if it’s at the top? I could flip it upside down. That puts the long run of pipe as far back as possible but then you’ll have the bends up at the top to connect upstairs.”

Nope! That worked just fine. The long run was taller than my fridge, so I could figure that part out later.

A few twists to loosen the pipe clamps around the rubber connectors. The entire PVC portion of pipe lifted out. Flipped upside down. And got clamped back in place.

And just like that it was perfect. For real.

Now go see what Sarah’s up to!

Posted in kitchen | 10 Comments

Grateful for Brick Walls

Today you are supposed to open your readers to dizzying parts progress and smack-talk related to the ongoing saga that is my kitchen renovation. Unfortunately, I have none of that for you today.

The past 2 weeks, I have been on India on a business trip. It was awesome. I fully expected to come home brimming with energy and enthusiasm and ready to dive, head-first, back into my kitchen and whip up some progress to show you today.

Monday morning, I landed in JFK to cold and snow. A rude awakening from the warmth and mild breezes of Bangalore & Delhi. Determined to hit the ground running and get back on Eastern Standard Time, I got home, showered, and went into the office.

It was a normal weekday and I was going to treat it as such. By mid-afternoon, the jet-lag was catching up and I succumbed to leaving early in favor of a nap.

That evening, instead of staying home and being productive (as originally intended), I went out. A relatively uneventful evening passed into night. At 12:35am, I get a text from my tenant – “Do you smell smoke?”

15 minutes later, I get a frantic call from my neighbor. CARRIE! 14 IS ON FIRE!!

Not comprehending what she actually meant I asked, “What do you mean 14 is on fire?” “It’s ON FIRE!” came the reply.

Scrambling out the door, into the car, and flying across New Jersey towards a rowhome fire elicits a sinking level of dread which, until that moment, I had been lucky enough to never feel.

See – I live at 16. My immediate neighbor – the home connected to the left side of my house – was on fire. For me, fire is the scariest of disasters for rowhome living. I’ve dealt with noise because of connected living. I’ve dealt with rats. But fire… fire makes all that look like small potatoes.

Fire wiped out large swaths of city homes at the beginning of last century.

Fire, even more than water, is the one thing that can cause incredible amounts of damage in the blink of an eye.

As the trees whip by out the side window of the car, I am steeling myself for the worst.
This is it.
This is going to be bad and there’s nothing I could have done to prevent or stop it.

The boys (dogs) are still at my parents.
My tenant is awake and out of the house.
Everything else?
Well…everything else is just stuff.

With that resolution came a calm that I’m still riding.

Whatever I pulled up to find, it would be ok.

I pulled up to find this:

Fire

Big trucks and flashing lights clogging my entire street. Hoses shooting thousands of gallons of water onto the smoldering shell of my neighbor’s house. The water coating everything in a thick layer of black, sooty ice.

Fire

Fire

Fire

Fire

The neighborhood convened at the local bar. Checking in. Talking about what happened. Sharing a pint (or 2).

The fire started up on the third floor next door. The house was rented out to a bunch of guys (mostly college aged). Fortunately, all the humans made it out alive. The kid living up on the 3rd floor is lucky to be alive. Sadly, he lost one of his dogs to the smoke & fire.

Hearing that made me even more grateful both my boys are still tucked safely away at my parents.

Because I wasn’t home, the fire fighters smashed in my front door to check the house.

Fire

Seeing the door I just spent so much time, money & effort restoring hacked & smashed sucks. I’m fortunate that it wasn’t worse and hopeful it’ll be salvageable.

Fire

Fire

Fire

To make sure the fire didn’t spread across to my home, the fire fighters tore holes in the ceiling of the 3rd floor hall & bathroom.

Fire

Fire

Fire

Fire

It’s a mess. There’s plaster, grit, insulation, lath, and dust everywhere. The entire house smells like a campfire.

There is damage to my roof.

Fire

Fire

And the skylight is destroyed.

Fire

But looking next door, it’s easy to remember that it could have been so much worse.

Fire

I still have a home to clean up. I still have clothes to bag up and send to the dry cleaner. I still have ceilings that can be repaired and a roof that can be replaced.

The fire fighters and the double layer of brick walls that separate our homes saved me. If this was modern wood stud construction, I would have nothing right now.

I have always loved my brick walls because they’re beautiful. This week, I’m grateful to have them because they saved me from this –

The next few days will be spent managing the initial clean up and getting the insurance ball rolling. Maybe they’ll be some kitchen progress next week.

In the meantime, go check out Sarah and her awesome window casings! I’m going to go kiss my brick walls.

Posted in general, kitchen | 64 Comments

Kitchen: To Do

image

That’s not fear it my eyes, Sarah. It’s the realization that you are the hare and I am the tortoise. And we both know how that competition ends. Enjoy your head start.

In the ongoing saga that is my kitchen renovation, it may be helpful to bring you up to speed about what’s already been done and what is still left to do. Lets make a list.

The past (almost) 2 years sometimes feel like I’ve come so far and yet aren’t even close to the finish. Writing this list mad me realize that’s probably a pretty accurate feeling but mostly because what’s left is finish work that takes exponentially longer per task (compared to say – demo or sealing the brick).

Already Done:
Demo
Discoveries
Buy new appliances
Clean & seal the brick
Plan new electric
Install new electric
Install can lights
Run water to the back yard for outdoor spigot
Have waste pipe moved over
Install new flooring
Refinish floors to match existing floor
Box in plumbing chase
Mortar in new bricks
Build fridge box
Fix walls & ceiling
Prime room
Paint room
Install nook cabinetry
Install main wall base cab
Create dishwasher cab

Left To Do:
Build sink cabinet
Finish buying IKEA cabinets
Install 36″ base cab
Install 36″ upper cab
Pick soapstone
Have counters templated
Fix & reinstall top part of fridge wall
Install shelf in ladder nook
Build out cab above fridge
Install ply on ceiling of main wall
Prime & paint cabinets
Finish 24″ nook upper install
Build soffit cabs
Prime & paint soffit cabs
Install soffit cabs
Install cover panel to soffit cabs
Install 15″ upper
Drywall blind
Mud, sand, prime & paint blind
Install 24″ upper cab in blind
Counters installed
Install faucet & appliances
Install range hood
Install rail rack shelf

Other Stuff To Do in Room
Stain & finish windows
Build out pantry
Design & build island
Buy parts & build chandelier

If you follow me on Instagram, you know I’m currently in India on a business trip. That’s made kitchen progress pretty slow this past week. Lucky for you, you still think the kitchen looks like this –

image

That photo was taken back in May of 2012. Through the magic of the Internet and working on it for the past year & a bunch, I’m excited to tell you that the kitchen now looks like this –

image

image

image

image

image

image

image

BOOM!!! Overnight success!

I may not have running water yet but I got some cabinets & paint.

Take that, Ug-Duck!!!!

Posted in kitchen | 3 Comments

Kick in the Pants

2014 has brought a renewed desire to blog. The past few years that desired waned and things were pretty quiet around here. Life happens.

I at least try to keep up with my favorite bloggers. It’s fun to stay current with what y’all are doing. As time marched on, I really missed having the progress on this place documented. This is purely selfish & self-serving, of course. It’s really handy to have something on the Internet to quickly reference when you can’t remember what color the living room was painted.

The stagnation here on the blog is not reflective of the progress on the house. The stoop is done! Like for realizes!! That’s hugely exciting.

The kitchen is slowly rolling forward. I’ve only been without a kitchen since June 2012. Yes – as in a year and 7 months. I mean…WOAH; right!?

Who lives without running water on their first floor for a year and 7 months?!?

This girl, apparently. But I’ve been working really hard to change that.

To give me that extra little fire to crack down and get ‘er done, I immediately thought of my friend Sarah’s kitchen renovation. Sarah at Ugly Duckling House has been chipping away at her kitchen for a while too. (Not year-&-7mo ‘while’, normal people ‘while’.) Like me, she had a few unexpected projects (like a laundry room) pop up that diverted her attention away from the kitchen.

When Sarah put out the call for people to do another round of Dueling DIY with, I was all, “Duuuuuuuuuuuude! Our kitchens would be perfect for this!!”

And she was all, “Um. Do you even blog anymore, slacker?” (She didn’t actually say that.)

And I was all, “I would if it meant finally finishing this freaking kitchen and kicking your butt in the process!!” (OHHHHHHHHH, SNAP!)

And then I spent an entire evening taking ridiculous selfies with my iPhone and Paslode so she would have something to use in the creation of this masterpiece –

image

Oh it’s on like donkey kong, my friend. Donkey.Kong.

Kitchen.

BRING IT.

So what exactly is this “Dueling DIY” thing?

Every Wednesday, Sarah & I will update on our kitchen progress (if there’s been any) (which there will be).

Nothing like a little friendly competition to keep us focused on the task at hand. For me, that’s finally having running water on the first floor and finishing this kitchen already.

Posted in Uncategorized | 7 Comments

Kitchen: The Plan

I realize I’ve never actually showed you guys the plan for my kitchen. I never really wrote it down. It’s just floated around in my head

I suppose this is a good thing because, as the renovation has progressed, there’s been about 3 significant design changes switching cabinets around. I’m pretty excited with where the design ended up.

Here’s the kitchen back before demo.

image

In May of 2012. That’s right folks. This kitchen projects started June of 2012. TWENTY-TWELVE, folks.

I’m just gonna let that sink in for a few moments.

Yeah… Lets hope we don’t actually hit the 2 year mark when it comes to finishing the project.

So the plan. The one long wall will remain the main wall of the kitchen.

Kitchen plan

Sink > Dishwasher > Stove > 15″ base cab > Fridge

I originally had planned to have a bunch of upper cabinets on that wall. That included a 24″ cabinet over the dishwasher and another 30 or 36″ upper above the sink. But, during demo, I uncovered the original brick and loved it. (Duh. What’s not to love?)

Keeping the brick changed the design a little bit but something have remained the same. The kitchen will be a mix of custom, IKEA, and customized IKEA. In such a compact kitchen, I cannot afford to waste a single inch of space. It’s very much like designing for a ship or RV. I am until utilizing every nook & cranny and, in a lot of case, custom building stuff to fit the space.

It’s slow going as neither my dad (my reno angel & partner) or I are cabinet makers. We are set builders. Well, we’re not really set builders either but it is in our background. I went to school for theatre and built my fair share of sets during undergrad. Dad spent several years building the sets for my old high school’s productions. This space will look like a kitchen. It will function as a kitchen. But it is probably not going to be built like most people would build a kitchen. Especially not people who actually build kitchens for a living. Doing things our own special way has allowed us to squeeze out inches most people, would have given up. It’s also taking a long time. I guess you can tell where my priorities are.

Back to the main wall layout. Fridge & storage above & to the right of it are at the far end of the kitchen. The fridge is over as far right as it will possibly go, as there is plumbing in the back right corner. The storage above & to the right are completely custom.

The wall to the left side of the fridge goes floor to ceiling and boxes in the fridge. It also provides a great starting point for the rest of the main wall. The bottom is pretty much the same setup as the original kitchen (sink > dishwasher > stove) but my adjusting the plumbing and going from a 30″ fridge to a 24″ on meant I could squeeze in a 15″ base cabinet. Going from 0 base cabinets to 1 is HUGE for me. I cannot wait to have a place to store all my cooking utensils that’s actually near where I’ll be using them.

Along the very top of this main wall will be a set of 15″h x 36″w x 24″ deep upper cabinets. The doors on all 3 sets will be from IKEA but I’ll only use the cabinet boxes for 2 of them. The third (and farthest left) cabinet box will be custom made so that it is actually wider than 36″. By making it wider, I can utilize the space in the blind, so that isn’t lost.

These rather short (15″h) but super deep (24″d) cabinets will look almost like a soffit. Obviously they’re way too high to be practical for everyday use but its perfect for things like my party beverage tubs and other special occasion items.

Under the soffit cabs, above the 15″ base will be a 15″w x 39″h upper (thinking spices, oils, etc. but we shall see). Above the stove will be a chimney style range hood. Above the dishwasher will be an open shelf.

This shelf, to be specific –

image

It’s a rack from an old New South Railways train car. I know it’s hugely popular right now but I’m not a huge fan of lots of open shelving. I think it’s generally impractical and annoying to keep clean and uncluttered. (Commence blogger stoning/shunning)

This rack was too cool to pass up (thanks, eBay) and I think I can manage keeping 1 open shelf presentable. I think. No promises.

Then there’s the sink. Nothing on the wall in front of the sink. Just gorgeous old brick.

Finally, a little blind immediately to the left of the sink. You can see it here, on the left –

image

It’s about 15″ deep. I was a little befuddled about what to with that blind in my original design. To keep the maximum amount of brick showing, the 24″ cabinet that was originally going above the dishwasher will rotate 90 degrees and hang on the side of the blind. A single door on the cabinet will open onto the brick wall. The blind is deep enough that you won’t see this upper at all when you look straight on at the main kitchen wall.

The other upper cabinet will get made up on the opposite side of the room. The mantel side of the room is what I consider “the dining room”. Sure. The whole thing is just one big (relatively speaking) room but I like have a kitchen & a dining room, so I differentiate between the two. Semantics, I suppose.

Anyway. On the mantel wall –

image

To the right side of the mantel is a closet that will be used as a pantry. It’s been completely gutted, so add that to the list. The left side of the mantel is about 48″ wide, wall-to-wall. The width of the baseboards and the radiator in front of the window makes it impossible to actually put a 48″ wide bank of cabinets but I can get 36″ centered on the wall and build it in with nooks on either side. I’ll hang a 36″w x 39″h upper cabinet on the wall above it.

This built-in set of upper & base cabinets will get topped with the same counter as the rest of the kitchen and provide additional buffet/serving space.

The third zone of the kitchen is the nook, between the arch to the front hallway and the pocket doors to the living room. While about 26″ wide, it’s not 24″ deep. Luckily, I can it a base cabinet down to make it shallow enough to fit. A 24″ upper hangs on the wall above it with the microwave hanging off the bottom.

The fourth zone of the kitchen will be a rolling island but I don’t quite have that figured out yet. The plan is to get these 3 areas in, finished, and the pantry built out. Then I’ll reassess my storage & counter needs. I anticipate need more counter space to prep on and who couldn’t use more storage? 24″ is a bit deep for an island, given everything else going on in here (dining room table, the fact that the house is only 18′ wide to begin with, etc). 18″ might be perfect but we’ll just have to see when everything else gets finished. I’m staying open to possibilities and options for the island.

So that’s the plan! Hopefully there won’t be any more design changes but you never know.

Posted in kitchen | 6 Comments

Who Needs Running Water, Anyway?

Lets just start with the obvious.

I didn’t host Thanksgiving.

I planned to.

I really wanted to.

I posted about it.

It didn’t happen.

I thought maybe I’d have everything done by Christmas. Or maybe, at the very least, have running water and therefore be able to host things pot luck style. Nope. That didn’t happen either.

And it’s not because things aren’t getting done. This house has been a project since 2009. You would think that, by now, I’d be a little better at estimating how long things take. Notsomuch.

Surprisingly, I’m very much at peace with how things are going and the progress that is being made. Every week another little thing gets check off the list. The list appears to keep growing. But at least it’s moving in the right direction – forward.

Looking through my past few posts, I realize that I’ve been woefully neglectful keeping this blog updated.

Lots to tell you.

Lots to tell you.

Lets get started.

Posted in kitchen | 1 Comment

Beauty Pics are Lies

Lest anyone think the beauty shots you’ll find on this website are an accurate depiction on my actual existence –

Oct. 3, 2013

I’m here to assure you, they’re not.

Not at the moment, at least. Those days seem like a lifetime ago.

Today, things are looking worse than they’ve ever looked (which is saying something). 9 months working on the stoop meant tools, supplies, and general falderal got shoved somewhere on the first floor. As long as the front door closed & locked, I managed to tune out the chaos and ignore the accumulating avalanche of crap that lurked just beyond the threshold.

Also, I don’t have anyone over except family & close friends. Stoop parties and truck bed picnics replaced gatherings that normally happen inside, around a dining table. Deep, calming breaths and a mantra of, “this is only temporary” have sustained my sanity for the better part of 2013.

Until this week.

This week the avalanche cracked and is threatening to bury my sanity under a massive current of paper, paint cans, ladders, and debris.

The pitbull puppy is eating & chewing on everything in sight. I returned from a college fair last night to find him excited to show me his new skill – BOUNDING ONTO WHAT SHOULD BE THE DINING ROOM TABLE. I immediately called my parents to borrow a dog crate. Should have picked it up days ago.

I’m hosting Thanksgiving.

Yah… Remember that part about no kitchen??

Not only am I hosting Thanksgiving, I’m hosting my best friend and her family (including the most precious 9mo old you’ve ever seen) the weekend before.

This, surprisingly, is very motivating. Rather than feeling overwhelmed, I’m actually a little excited about a 6 weekend deadline. (Holy crap! 6 weekends!!)

So there’s where things are in the great Brick City.
Avalanche.
Accidental pit bull puppy.
Thanksgiving.

Happy Fall.

Posted in Uncategorized | 5 Comments

Good Enough For Court

This was supposed to be a post all about sand blasting but that’s not quite ready for prime time yet. It was a big job and something worth sharing but I want to do it right with all the details. When I was researching sandblasting, I had a really hard time finding DIY info. Unless I wanted to blast a ’59 Chevy or something small in a blast box, that is. Then I could read all about it. I’m going to try and fill that DIY void. No promises though.

As a side note – all you car enthusiasts are no joke. For REALZIES. The passion you guys have for restoring cars is like what we DIY bloggers have for power tools. We should be friends. I bet we could learn a lot from each other.

Also, I’m openly soliciting invitations for someone to teach me to weld. I want to make things out of metal. If you weld, have the equipment and can teach me, I’ll bring the beer and buy the supplies. Deal?

Offers of friendship aside, progress on the stoop has been really trucking along. Until last night when it came to a screeching halt. But before that, things were really moving.

As you may remember from the last update, things have been blasted, ground & stripped. The hole in the front steps was also patched up with mortar.

This is what things are looking like as of a couple days ago –

I had hoped to have the entire project done-done by the time I go back to court Friday morning. I feel confident I have all the charges addressed but I had hoped to have everything completed. Mostly because I just wanted to have the front checked off my house project list.

As you may remember, all this started because the City of Newark didn’t like how the front of my house looked. According to the prosecutor, I “live in a nice area of Newark” and they “want to keep it looking nice.”

I’ll just let that marinate with you for a minute…

Yes, my peeling paint was the blight of the neighborhood. Ok then.

So here’s what the problem was (and I’m paraphrasing because I don’t have the summons in front of me):

  1. Failed to repair/replace peeling paint. Check!
    All of the peeling paint is completely gone. You may not like the blueish tint to my current portico paint job but I don’t think the courts can legislate my design choices. And the lentils are completely repainted so – double CHECK! – to that.
  2. Failed to repair/replace rusted loose railings. Check!
    The iron workers came and removed the rusted loose newel posts and took them for repairs. They’re not back yet but nowhere does it say I HAVE to have newel posts. The loose railings are gone. The popped 1/2 round part of the top fence has also been welded back in place (it was previously wire-tied in place, so it never stuck up all pokey like that).
    Untitled
  3. Failed to repair/replace rotted wood porch. Check!
    Since I don’t have a wood porch, I can only assume they mean the wood portico around the stoop. DONE. It’s not pretty but the rotted wood & hole are gone. And it’s going to be completely hidden anyway with eventual baseboards, so it can look all lumpy & bumpy and you’ll never ever see it. (Aside from the picture below that I put on the internet. The irony isn’t lost).
    Untitled
  4. Failed to repair/replace hole in front steps. Check!
    Again, since the steps aren’t wood, I can only assume they meant the gap between the sandstone and sidewalk. That has been filled (very nicely, I might add) with mortar and is looking quite beautiful.
    Untitled

Things were really chugging along and it looked like I might be able to hit my Friday deadline. Then I hit a snag a couple days ago trying to dry-fit the arch. It was fabricated incorrectly. The radius/curve of the arch is correct but the legs slant in. When you get the legs vertical, the arch flattens out.

Untitled

It needs to be redone. The company has been great to work with so far, so I expect they will make things right. I’ve made a template out of foam insulation to use as a guide, which I’ll take down to them next week.

This is obviously delaying things. I was disappointed to not call the project DONE this week but I think it’s all for the best. The arch not being right is, perhaps, just the speed bump things needed.

The primer was supposed to cure overnight. It hasn’t.

I was all set to go with Midsummer Night (as seen on the arch half in the above photo) but now I’m not. Even bought a whole gallon of the good exterior paint in it. It’s just too similar to the railing/lintel color. Not enough contrast.

I literally bought out the store of sample paint sizes. No joke.

Untitled

I’m looking for a neutral color that’s lighter than the railing/lintel color and leans towards gray (rather than tan) but isn’t battleship gray or too light. But not too dark. Warmish but not fleshy. And not too blue or green.

So, since I need to have the arch redone and want to give the primer plenty of time to cure, I’ll continue to agonize over finding that perfect shade of gray-but-not-too-gray.

All you color experts out there – feel free to weigh in.

If you want to see the crazy as it happens, feel free to follow me on Instagram. It’s been hard to find time to blog regularly but taking 2 seconds to post a quick pic is totally doable.

In the meantime, I’ll keep working on those sandblast posts and attempt not to drown in my ever-growing collection of paint samples.

I’m THISclose to throwing them all in a 5-gallon bucket and calling whatever comes out “good enough”. Except the samples aren’t exterior paint and that would just be an awful idea.

But I’ve thought about it.

More than once.

Posted in out front | 9 Comments

Stoop Update

So April & May happened and now it’s June.

HI!!

The problem with taking long breaks between posts is there seems like an insurmountable amount of info to share. Things may have been quiet on the blog but they certainly haven’t been quiet at home. Here’s a random photo dump for ya.

Untitled

Untitled

That happened. These are actually ‘in-progress’ shots from the shop. The final coat is a white skim coat. It is now lying in pieces on an air mattress in the guest room. True story.

Arch? CHECK.

Then this happened –

Getting the sandblaster

Yup. Rented a legit, professional sandblaster to take care of the iron work.

Untitled

Sandblasting was, honestly, kind of a pain in the ass. It’s a very long story that deserves a separate dedicated post. Basically, I couldn’t find anyone to blast the railings in place (job is too small & annoying), so I did it myself.

Spoiler alert! It turned out pretty awesome.

iron before & after

Railings? CHECK!

Now, onto stripping. The wood portico needed all the paint stripped, so first I tried a chemical stripper. Mediocre results.

Untitled

Heat gun definitely worked better.

Untitled

Untitled

Untitled

Untitled

The metal lentils above the windows got some attention from the grinder with a wire wheel attachment. The grinder worked better than the wire wheel on the drill driver.

Untitled

Untitled Untitled

Finally, the hole in the step got some new mortar.

Untitled

This, my friends, is actually the only thing 100% completed on the list. Lets all say a little cheer for that.

So much left to do but that’s where things stand right now.  I go back to court for a final time at the end of the month, so here’s to pushing hard to get things completed.

What’s new with you guys??

Posted in out front | 45 Comments

Foam Party

Phew! I was a little worried about how my choice to replace the rotten wood arch with foam would go over but y’all are an understanding bunch. I honestly think it’s the best choice for this project and I had a few questions about it on the past post.

First off, I am not an expert on this subject but I’ll gladly share what I’ve learned. At the very least, it might serve as a starting point for your own research.

This is the second time I will be using foam on the house. The first time was in my 2nd floor bathroom, so we’ll start there.

DSC_0626

Both the crown moulding and the center medallion in the bathroom are foam. In comparison, the window casings are original & solid wood.

Why foam? Well, for a couple reasons.

Most homes don’t have crown moulding like mine. I’m spoiled/lucky/blessed/whatever you want to call it. It’s a historic home. While they come with a lot of work & problems, they also come with awesome details like bigass crown moulding.

DSC_0018

I wanted giant chunky mouldings but didn’t want to layer multiple pieces to achieve the look. (Like this -)

.

Urethane moulding gave me the size I wanted at a price & weight I could manage. Because urethane is so lightweight, it was easier for me to hold up & install by myself. They’re also water-resistant but install just like wood. I ended up using this crown and this medallion.

The 2nd floor bath is one of only 3 rooms (the other bathroom & my closet) that don’t have crown moulding. It was also the only room on the 2nd floor without it, so it looked kind of odd & out of place. The room felt more like a part of the house once the crown was installed.

2nd floor bath before-after 5

It’s relatively simple to install, as it goes in just like wood crown (except lighter). I used a combination of adhesive & brad nails (cordless Paslode finish nailer FOR THE WIN!), although you could screw it, if you wanted. I did have to borrow a bigger miter saw from a friend though. Because the crown was so wide (about 10″), I needed a compound miter saw with a sliding arm.

2nd floor bath baseboards

(That’s me cutting the baseboards but the crown was about as wide. The saw was just barely big enough to cut both.)

After using foam in the bathroom, it was actually my mother who suggested using foam to replace the rotten wood arch out front. It was also my mother who took the above photo of the gawker. I don’t have a driveway or a garage, so the street becomes my workshop and people get curious. You’re welcome, Newark.

For the arch, I looked at architectural foam. What’s the difference between urethane & architectural foam? Well – (& here’s where you remember I am NOT an expert on this topic. yet.) – a few things, from what I can tell comparing the two.

Neither will rot, split, or crack. Both are impervious to termites. Both are paintable. Both install just like wood would or with simply adhesive. Both are purely decorative, as neither are load bearing.

foam comparison with labels

The differences are in how each is made. The urethane foam seems to be made of a finer grit foam, whereas the architectural foam reminds me more of a styrofoam cup. When cut, the urethane creates almost a fine, sawdust-like dust. The urethane one comes factory primed and the website says it’s ok for interior & exterior use.

Untitled

Looking at a cross-section of it, you can see the coating is really thin. I wonder how it would actually hold up to exterior elements (branch or hail whacking against it, for example). Maybe in an overhang, where they’d be protected a little more, it would be fine.

Untitled

The core of architectural foam is made out of expanded polystryrene (EPS) in a 1lb density. Sort of the same stuff as a high quality styrofoam cup. The shape is cut and then the whole thing is coated in a 2-step process. First they coat it with a thin layer of cement (the dark gray layer). Then it’s coated with your finishing product – either a stucco or paintable skimcoat – depending on what you want. The paintable skimcoat is shown below. While not load bearing, this shell seems harder & more durable to me.

Untitled

Also, most places that do this sort of thing do lots of custom stuff. The urethane foams at Architectural Depot (there are lots of other places to buy them too) were all stock. While this arch will cost more than what I spent on my bathroom, it is completely custom and less than I would have spent recreating it in wood.

For my arch, I went with EPS from Trim Factory in Pilesgrove, NJ. We can chat about them more later but so far so good. They were one of the few companies who actually responded to my inquiries (my job is pretty small) and Peggy has been super responsive.

These giant EPS foam blocks get cut down with computer-driven precision to whatever your specifications are.

Untitled

The scalloped pieces on the floor are slated to be installed on the walls of a curved room in some mansion. Fancy stuff.

Architectural foam comes in stock pieces, too. Here are a bunch of pieces that have their cement coat. The final coat is done after their ordered.

Untitled

I don’t think one is inherently better than the other; it just depends on you job. The urethane foam worked great in my bathroom. Lets hope the architectural EPS foam works as well as I expect it to out front.

Posted in out front, Product/Service Review | 7 Comments