
When we began, the garden apartment bathroom looked like this. The floor was covered in uneven, square white tile.

At the end of our first Demo Day, we had a clean slate.

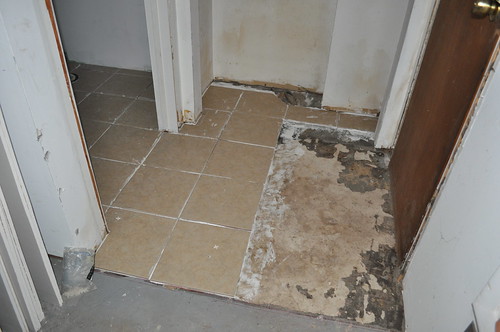
I’m sure we could learn to tile. Heck, we probably will learn to tile eventually but in this particular situation, we had an ace up our sleeves.
My father-in-law loves to tile; legitimately, cross-my-heart, actually enjoys it. It’s spectacular. By the time we got the coffee and donuts set-up upstairs Saturday, I came downstairs to this. Guidelines measured & drawn out. The first 3 tiles already laid. It was going to be a good day.

The hardest cuts would be around the toilet.

But he did it so precise!

Do you see how perfectly it fits around the toilet? Mad skills.

By the end of the day he was nearly to the door. Yeah, I’m impressed too.
Thanks Dad!!!


Hi, Taline told me all about the great weekend she had up at your place and she suggested I check out your blog. We will be doing our bathroom after after we finish our landscaping project.
So looking at the pictures it looks like he laid the tiles directly on the old ones is that correct?
Good luck !!!
Hi! Thanks for stopping by. It was awesome hanging out with Taline; glad she had fun too.
We actually removed all the little white tiles before laying the new ones. Wanted to start with a clean surface. The concrete underneath them was a little stained, which is why you see the grid marks from the old stuff. I’d definitely recommend removing the old tile before laying down new stuff. It just makes for a sturdier foundation. Good luck with your bathroom!!
Definitely remove the old floor first. Get the area as clean, flat and stiff as possible (if it’s really bumpy or flexes too much you may need to install a sub-floor or use a “flash patch” to level). Most of the bumps and lumps in the floor were dues to old glue/adhesive and I chose to chisel them smooth rather than cover with flash patch. Retropectively (hind sight always being 20:20) I may have brought in a grinder and took a couple more spots down a bit more. Good knee pads and patience are a MUST.
Have fun.
You are really getting things accomplished. It all looks good. I am new to your blog and it has fast become one of my favorites.
Is your FIL available for rent? I could use some tile help in my master bath. If he is happy with coffee and donuts then I am happy to provide. Hee hee.
Thanks Anna! Welcome!!
haha – I think we get the “family-obligation” discount. 🙂
Looks so great! You have great dads! =)
We really do!! Thanks!
Pingback: Almost Before |
Pingback: Garden Apt. After: Bathroom |