
WARNING. This post really should be about 5-8 individual posts but because I’ve been compiling it for 2+ weeks, it’s all coming in one GIGANTIC post. There are literally 60 photos in this post. Hope you’re comfy with lots of time to kill.
>>>>>>>>>>>>>>>>>>>>>>>>>>>>>>>>>>>
The 2nd floor bath is the main bath for the house, as there’s not one on the 1st floor. It’s right at the top of the stairs. It’s the first room you see when you look up the stairs and it’s the only bathroom most people ever see unless they hike up to the 3rd floor. It’s also the ugliest bathroom in the house. Sadly neglected for years.
At the inspection, before officially owning the house, the bathroom looked like this.


The electric-blue shower curtain wasn’t much of a distraction from the brick-red tub, peeling brown floral wallpaper, and the uneven, cracked, & perpetually disgusting “white” tile. And I use “white” very loosely.
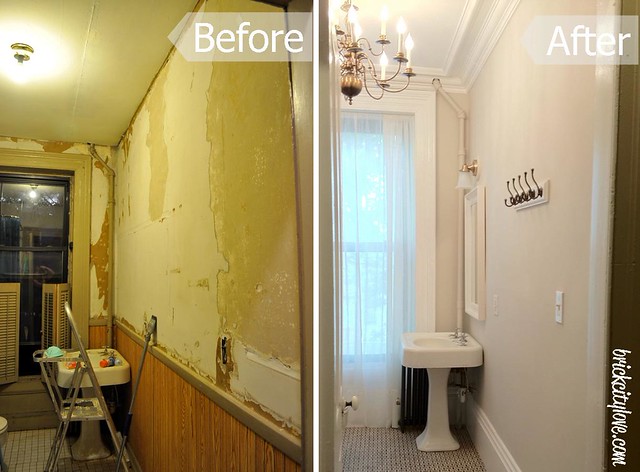
Two months after we moved in, July 2009, it got worse. Well. It was supposed to get worse and then immediately better but we got sidetracked renovating other rooms and doing other projects. See, in July 2009 we had some very generous help removing the wallpaper in preparation for the bathroom redo but – in typical newbie fashion – we started about 20 projects simultaneously without focusing on 1 at a time. The bathroom quickly fell by the wayside in favor of more pressing projects like the master bedroom and garden apartment. So, for 2.5 years, the bathroom looked like this –


It’s amazing how things become normal after living with them for a while. Looking at these photos is proof that is was truly awful but I had kinda stopped noticing it. Yikes!
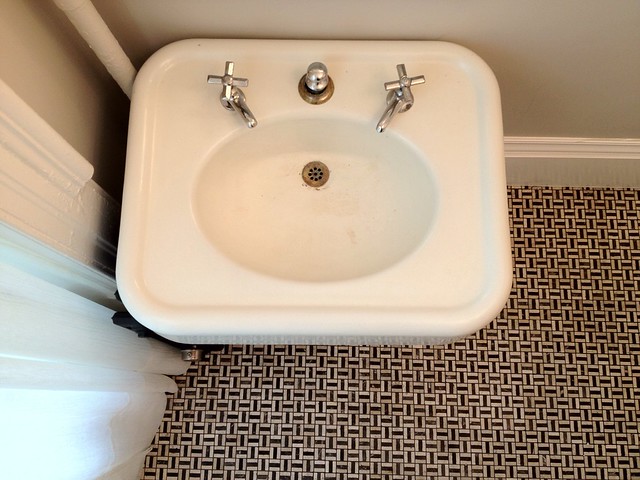
This bathroom is a little less than 6′ wide and a little less than 10′ long. The original layout makes sense, so that stayed. I love the claw foot tub and cast iron pedestal sink; both those were definitely staying! The toilet worked fine; no real need to replace that. The moldings around the window & door were original; they stayed.
Everything else?? Pretty much got demoed.


3 of the 4 walls were taken down to the lathe/brick. The 1 wall that stayed was the 1 wall I originally planned to demo. Funny how that happens. The ceiling stayed because it was already drywall but it needed lots more screws & skim coating. Spackle & sanding is pretty much the bane of my existence and this room need it in spades. SPADES.
New drywall on the 2 short walls and Dad ran new electric so I could have a light above the mirror (a novel concept).

After removing the old floor and taking everything down to the floor joists, we made a little, not-so-comforting discovery. One of my joists – the one directly to the left of the toilet (aka one that keeps the toilet & anyone sitting on it from landing on my stove) had been whittled away over the years to accommodate various plumbing configurations as technologies changed.
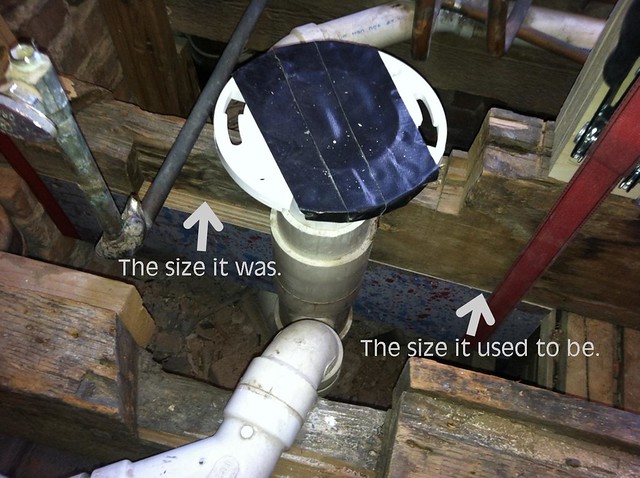
The house was built in the 1880’s. I’m very glad I’m not dealing with the original plumbing (if there was any; which is debatable). I wasn’t happy, however to find one of my major support joists carved down smaller than a 2×4″. Yeah. That happened.
We fixed it though. My dad’s pretty much a genius when it comes to problems, engineering, & plywood.

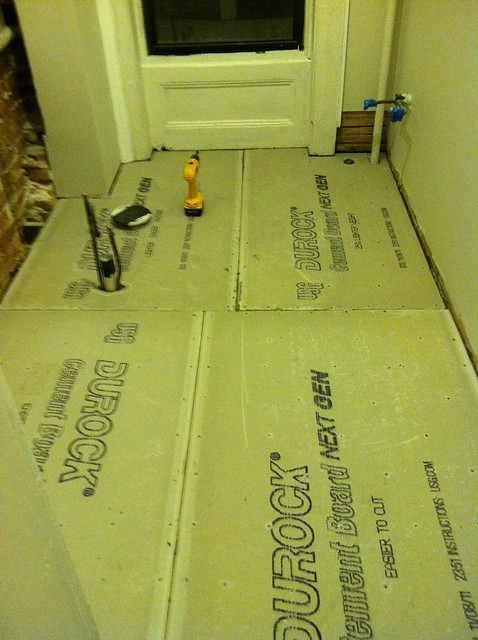
Once we were sure the toilet wasn’t going to find it’s way down to the stove, we could FINALLY put down the subfloor (3/4″ plywood).

Then mortored down the durock.
Then I built this nifty custom hole cover/TP & toiletry holder to hid the hole in the brick wall that’s behind the toilet.

I would like to point out how the lower shelf is perfectly sized to hold 5 rolls of toilet paper. Cause I’m detailed oriented like that.

And sealed the brick.

Then I finally laid the tile.

Crown moulding. (Which is honestly a real bitch in an old house like this. I may have punched it in a moment of extreme frustration.)

Lights.

Baseboards.

Blah blah blah. Lots of hard work. Too many details to cram into this post cause it’s already a million photos long.
Then I broke it.
I broke my brand new, so-close-to-finished bathroom. Specifically, the plumbing.
The plumbing sealed away under my brand baseboards new tile, durock, mortar, & subfloor.
While doing the final touch ups on the crown moulding, I moved only a ladder, not the entire scaffolding I had been using.
Forgetting I only moved the ladder, I stepped back onto what would have been scaffolding. Instead, I found nothing but air.
I fell off a ladder, knocked a full trim cup of semi-gloss onto my newly tiled floors and landed flat on my back, my butt directly on the exposed drain pipe for the tub.
There were tears; once I regained breathing from falling 6′ and landing on solid stone tile. There was also a wicked bruise on my tush but I wouldn’t’ discover that until several minutes later. The only thing I could think of was MY TILE.
The tile I just spent HOURS laying & grouting & scrubbing was now splashed with white semi-gloss paint.
Luckily the semi-gloss came up (with lots of scrubbing). (Keep it wet folks!!! Wet latex paint it water-soluble!) and the plumber came back. He had to cut a hole in my kitchen soffit to fix it.

But that’s better than ripping up the fresh new tile (& durock & subfloor & baseboards). Bring on the kitchen renovation!


Long(er) story short, after all was said & done – when you walk up the stairs now, this is what you see –

A finished bathroom.


And all the little details:

The baseboards are about 12″ tall and made of 2 stacked pieces from Home Depot (a stock pine board that we routed an edge on with a piece of chair rail sitting on top).
The crown moulding and ceiling medallion are from Architectural Depot (who price match!). After scouring the internet for cheaper prices on the exact same things, they beat the lowest prices. Spent about $240 total for crown & medallion, including shipping.
The crown is painted stock white, Behr semi-gloss, as is the rest of the trim in the house. The medallion is sprayed with glossy white spray paint. To be honest, I don’t love the Behr semi-gloss but keep using it because the 5-gal bucket is already paid for.
The walls are Athena by Benjamin Moore painted using their matte kitchen & bath paint. Pricey; we’ll see if it was worth it. The color is lovely in person. A great greige that really changes depending on the light. Sometimes more beige, sometimes more gray; looks like a color against white-white trim but still light.
The tub & radiator are Raccoon Fur – a lovely navy, black, charcoal dark neutral – also from Benjamin Moore. The color can also be seen in a bathroom once occupied by Daniel from Manhattan Nest.
The brick is sealed with 2 coats of low luster sealer ($27.98) to keep it water tight and from being a crumbly dusty mess.
The clawfeet are painted with a Marth Stewart gold mistint found for $1 in the Oops pile. Best.mistint.ever.
The add-a-shower kit came from a local hardware/plumbing supply store, Economy Supply ($96.60 plus the support pieces I attached to the walls). Their prices are reasonable but not rock-bottom. Add-a-shower’s are surprisingly hard to find for a good price though.
The hooks use the board from an IKEA LEKSVIK rack ($9.99) but swapped out the pewtery hooks for brass hooks from Home Depot ($4.27/ea) and painted white.
The light ($33) over the mirror is from Progress Lighting (Progress Lighting P2832-11 Wall Bracket with Flared Satin-Etched Glass Shade, Antique Brass).
The brassy chandelier is a $40 craigslist find. With 60 watt bulbs it put out a blinding 720 watts, which was actually too much light (which I never thought possible). Knocked it back down to 25 watts/bulb for a still bright 300 watt output.
The curtains were made by my mom with fabric from my favorite local fabric store, Halsey Fabrics. I lurve the super deep hem that mimics the height of the baseboards.
The shower curtains are a mix of clear plastic (to still see the brick) and a fabric one on the outside (BB&B with 20% off coupons). I don’t love the huge grommet tops but I liked the sheer part at the top. In such a small space, I tried to keep sightlines as open as possible. I’m also completely ok with mixing the silver metals on the shower, tub, & TP holder with the antique brassiness of the lights & hooks.
The HEMNES mirror is IKEA with a couple coats of glossy white spray paint (because IKEA’s “white” isn’t actually white).
The floor is Marfil Brown 12 x 12″ natural stone tile from Home Depot and a bit of a splurge at $8.97/sq ft but very much worth it. Also, it doesn’t look brown. The dark centers of mine are clearly charcoal with beige around them. Grouted with dark charcoal grout like Anna at Door Sixteen did in her vestibule.

And because this post needs to be a little longer (she says sarcastically), here are another 10 photos.


Who knew you could take so many photos of such a little room?!
Hope it was worth the wait!


heck yeah, it was worth it. Stunning.
Thanks Mary!
Hey Carrie, I love your bathroom renovation! Well done, it is really fantastic.
What a great post – the sequence is like a time machine…. progress, click… more progress, click click…. done! Especially like the last 10 photos of before and after!
Crazy. That transformation is amazing! I love the drama of the claw foot tub and chandelier.
Love the bathroom reno! It’s great that you kept the exposed brick, I hate when people cover it up. It adds so much character.
It’s beautiful! One of my favorite bathroom remodels ever. The brick, the moulding, the chandelier, the tub, the tiles. I love it all. Great, great, great job.
oh wow! i esp. love the black tub and the brick wall. great job, it looks fantastic!
amazing, well done! i really like the exposed brick, and how you’ve updated everything but kept a classic character for your classy (? =) old house. the gold feet on the tub are killing me! =)
So. Fricking. Amazing. All of it. Including breaking the plumbing with your ass, which, let’s face it, we’ve all been there. Well, maybe not all of us, but I definitely have.
Carrie, you did an awesome job on this room. Can’t wait to see how that kitchen turns out!
I’m am just simply amazed at your talent…and patience for all that DIY!! it looks fantastic!!
Fantastic! Totally worth the pain in the butt…
I love the light fixture and the trim. Also, how lucky are you to have such great exposed brick?! I can’t wait to see what you do with the kitchen now!!!
Thanks!!! 😀
Pingback: The Pipe is Gone |
Pingback: Exposing Brick |
I am blown away by this bathroom.
Thank you!!
Just wow. This is stunning!
My GOD what a gorgeous bathroom. I love that you went to the trouble to keep it true to the original style of the house, reusing the original old tub, faucet, and rad, but at the same time, sprucing it up, and giving it a new, fresh look. I just found your blog/site through a link from Northeast Portland Bungalow. I’m definitely subscribing/bookmarking.
Thank you!! I hope to get back to blogging in the new year.
WOW!! I love EVERYthing you’ve done with this bathroom. It’s so elegant! I love that you kept the sink and bath. I was coveting that gorgeous claw foot and then sorta pre-cringing as I continued scrolling, just knowing I was going to see that you’d ripped it out in favor of something more ‘pracitical’ (ick, how I loathe even the word!) or space-saving or whatever. Shwew, you kept it. Bravo! I also am a huge fan of beautiful lighting, most particularly chandeliers, in bathrooms so here’s another major happy note for me to see. And that floor tile. Yummy!! Your mum’s curtains are beauties and definitely add that touch of class and elegance, you’ve kept things simple and understated, used gorgeous paints and cleverly disguised the hole in the brick. Oh, yeah, the exposed brick! Be still, my beating heart… If the rest of the house was a shambles and the bathroom looked like it does now, that would be the seller for me. Your vision and talent are UH-MAY-ZING!! I’m going to sign, seal and deliver this message now before the drool ruins my keyboard. PLEASE, get a TV show!!!
This might be the nicest, most amazing comment ever. Thank you!
It’s just the truth!! 🙂
i got to say you are an absolute GENIUS!!!! I am in complete awe that you converted uhh that to WHOA NELLY!!!! I am too just starting to renovate a 110 year old brownstone in Queens NY. So many issues as you probably know already but YOU have given me so much hope, thank you!!!
Sincerely, Rajeev A.
and another thing, i love this site, but if you haven’t heard of this place ( http://www.bignyc.org ) its awesome. Went there again today to look for some old old old doors. They have everything you can think of at rock bottom prices for a person like you that is super handy. I just pick up 36 x 96 doors for 30 bucks each!! solid OAK!!! i know unreal, they have a few locations too!!!
Pingback: On 2012 & The House’s Post Break-Up Haircut |
Pingback: Arched |
Pingback: Foam Party |
So, I totally had to come back to this post and just drool over your bathroom again. It’s AMAZING!!!
Definitely one of my favorite bathroom renovations! 🙂
Awesome job. Thanks for taking the time to photograph all the progress!
Wow! That was fun! Not so for you, though, I’m sure : ) I just found your blog and am riveted. You are my new hero.
I have a question which seems so teeny tiny compared to the massive job you did, and gorgeous too, but the claw feet on the tub seemed like they had no definition and the scallop at the top looks like before it was so low. Did you somehow take some layers of paint off or did you get new feet? In the gold they just pop compared to before. Well, everything pops. Absolutely stunning!
Pingback: Kitchen: Buttoned Up |
Pingback: Kitchen: Up, Up, & Away! |
Omg!!! I love this!!! You have inspired me to keep going on my renovation!! Im trying to build a wall in shower against the back side of a fireplace. Some bricks are out from where a wall oven was. Im hoping ro be able to use that as a bench seat!!