How To: Diamond Tufted Headboard, Part 3

In Part 1, I showed you how I turned this –

old headboard

into this –

headboard finished frame

In Part 2, I made the inset panel –

DSC_0547

Punched out the holes for the buttons –

DSC_0603

And covered it with batting –

DSC_0630

Now onto the fun part. TUFTING!

Before I began tufting, I did a lot of research.

Try looking under the following terms:

  • diamond button tufting
  • deep button tufting

I honestly didn’t find a ton of “How To’s” online for this. These were probably the most helpful:

A few months ago I was really frustrated. I had followed the Apartment Therapy instructions to the letter but my tufts were looking flat and blousey. Not at all like their ‘after’ shot. So I ripped it all out.

DSC_0865

The batting alone didn’t provide enough fluffiness and my 3″ green foam was really stiff.

If I were to do this whole project over again (HA!!), I would probably use 2″ foam. The 3″ was more expensive and I think I would have gotten pretty much the same effect without ever missing that extra inch.

So I’ve took it back down to the batting and started over.

DSC_0638

Looking around the house, I found an old pillow that we sometimes used to punish our overnight guests.

DSC_0483

Opened it up and found totally usable FREE fiberfill.

DSC_0485

Pull the fiberfill apart and fluff it up. Stuff it under the batting, in the center of your diamonds.

DSC_0532

You don’t need the fabric to be any larger than your frame for normal tufting.

With deep button tufting, you need enough fabric to go do into the button hole and back up. Here’s the diagram I used to help wrap my brain around how much fabric I would need.

Picture 6

I then measured out where all the buttons would go and marked each spot with a pin.

DSC_0621

Having the location of each button marked helped keep everything even an lined up when I started tufting. However, I found there was actually too much room between each pre-marked spot. Because they were just marked with pins, it was easy to readjust. I started in the middle and worked my way out to the edges. By the time I got to the outer columns, I was mostly ignoring the pins altogether.

DSC_0626

Tools –

DSC_0576_2

Now lets tuft! Here’s a video of how I did it –

If you couldn’t see how I make the knot, here’s different look –

After all your tufts are done, it should look something like this –

DSC_0503

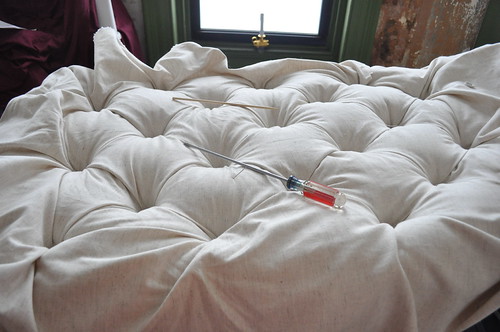
Pulling the threads, try to even out the depth of the buttons. It didn’t totally work for me. Some of my buttons sit deeper than others and I’m ok with that.

When you’re happy with how your buttons are sitting, tie a knot with the 2 threads behind the backing button.

DSC_0620

Using your staple gun, staple the fabric to your frame.

DSC_0630

As you can see in this picture, I continued the diamond shape around the sides.

DSC_0625

DSC_0635

Trim off the extra fabric

DSC_0645

Lay the tufted insert on the floor, tufts up. Push the headboard frame around the tufted insert.

DSC_0648

The insert frame should line up with your headboard frame, just like it did before you wrapped it in the batting & fabric.

DSC_0651

Find your pre-drilled holes and screw the insert to the headboard frame.

DSC_0671

And you’re done!!! YAY!!!!!!!!

diamond tufted headboard

diamond tufting

deep button diamond tufts

DSC_0623

DSC_0586

It’s a lot of trial & error but if you have any questions, I’d be happy to help. Happy tufting!!

Posted in 3rd floor, bedrooms | Tagged , , , , , , , , , , , , , , , , , , , | 122 Comments

The New Medallion

I posted our closet after photos before the closet was completely done. It’s basically done but the light fixture an shoe organizer left a lot to be desired.

You can see the peek at our hanging single bulb in this shot –

DSC_0360

Lets get a better shot of that classiness –

DSC_0491

Oh! You want a closer look?! OK!

DSC_0485

Lovely, isn’t it? Indeed.

But I think we can do better.

Enter, stage left, this stock medallion (painted semi-gloss white, same as trim) from the local orange big box store and some adhesive.

We have 5 other medallions throughout the house, so this seems to fit right in.

DSC_0502

Take some of that adhesive and goop it on the back of the medallion. Center around the hole. Squish into place.

DSC_0514

The directions suggest screwing it into the ceiling as well but I didn’t. Instead I replaced the old silver light fixture {painted white} and mounted it back in place.

DSC_0516

The old mount actually overlaps the medallion and holds it to the ceiling.

DSC_0521

Much better, right?

DSC_0524

Now for my crowning find, the chandelier.

DSC_0710

My dear friends Lyndsay & Luisa found it at Urban Outfitters {on clearance!} and knew I would love it! Have you my baby doll molds? Yeah. LOVE IT. And somehow fitting for the closet of my dreams.

Posted in 3rd floor, bedrooms | 8 Comments

That’s IKEA??

Scrolling through my reader, I saw that IKEA is going for a brand new look for their new catalogue. Check it out!

agent bauer ikea 1
{my favorite set from the whole shoot!}

agent bauer ikea 2
{In my imagination, this was shot backstage of a vaudevillian burlesque show. A guy with a handlebar moustache and a curvy woman with a feather headdress & sequin bikini are warming up just out of the frame.}

agent bauer ikea 3
{Bruce needs a giant aqua water bowl, don’t you think?}

agent bauer ikea 4

agent bauer ikea 5

agent bauer ikea 6
{I’ve always liked these vases but they look even better as a group of 30 en masse.}

agent bauer ikea 7
{Look a pony!}

agent bauer ikea 8

{Found via Not Your Average Ordinary, via A Lovely Being, & originally Lo Bjurulf <- amazing how the internet works, huh?}

So different than the usual “IKEA” look, right?! Love it.

Posted in Inspiration | Tagged , , , , , , | 5 Comments

Where Did I Leave Off?

Rolling back into the regular bloggy routine is taking more discipline than anticipated.

Perhaps it’s because I haven’t started the summer renos and therefore don’t have much new content.

I know I left you hanging on a few projects –  

  1. Part 3 of the diamond tufted headboard saga. {here’s Part 1 & Part 2}

    I’ve been promising it for about 8 million years so that’s LONG overdue. Hmmm… I wonder if the delay has lost all intrigue and excitement from that project.

  2. The little Alaskan getaway we took right before graduation.

    Oh! I didn’t mention that?! OMG YOU GUYS! So.Cool.

    Longtime readers may remember that my brother lives up there. He just graduated from Alaska Pacific University and we went up to watch him turn that tassel.

  3. New medallion & light fixture in the closet

    This is another one that you actually didn’t know about but it’s up and still looking fabulous.

What else?

Was there anything else I promised to blog about and then forgot?? I’m sure there is!

Leave a comment and let me know. Want to start the summer with fresh, clean slate.

Posted in general | Tagged , , , , , | 6 Comments

Summer TO DO List

It’s that time of year. Time for lists and lists and more lists.

I ❤ lists.

So. What’s on tap for the summer?

1. Finally finish the basement garden apartment.

DSC_0185

OMG this basement has taken forever but this summer it’s going to get done

2. Finish the 2nd floor front room {of the formerly soundproofed variety}

DSC_0097

There are several other things I’d love to do this summer – like paint the downstairs & the hallway, and finish the risers on the staircase. But if this first year of home ownership has taught me anything, it’s that things always take way longer than you’d like them to. Here’s to a summer with a realistic, manageable list! Hip hip hooray!

Posted in general | 3 Comments

Where Have I Been?

After a rather extended blog hiatus, I am back. Ok ok. I’ve been done for a while but a girl needs some recoup time, don’t you agree? Cheers.

I did in fact graduate. Huzzah! They tell me I’m now a master in Public Administration (with a certificate in Nonprofit Management) and, if I cared to do so, I could add those three pretentious little letters (MPA) to the end of my signature block. {What is an MPA? It’s kinda like an MBA but for the public sector, government, nonprofits, education, etc…}

DSC_0119

I may or may not have graduated with a 4.0 and been inducted into Pi Alpha Alpha Honor Society.

DSC_0051

You may or may not be getting a sneak peek at my office.

DSC_0067

That may or may not be an authentic velvet Elvis in its original frame classin’ things up.

DSC_0130

Now lets get back to doing this thing they call “renovating.” Holla.

Posted in Non-house | Tagged , , , , , , , , , , , | 9 Comments

Happy Birthday, Brick City Love

Exactly 1 year ago today, I was lying in bed taking a nap and Rob was sitting in the living room of our apartment. We were anxiously wondering if today was the day. Would we actually close on this amazing wreck of a house we fell in love with?

Shopping for a house was easy and fun but the negotiation and closing part sucked (sorry for using that word, Mom). It sucked SO bad.

Last spring basically went like this –

We love this house! Lets put in an offer. Were they going to accept this offer? No? How about this one? Nope. Ok… This one? Were we going to get our financing? Who’s gonna give us the best rate? Yay we got financing! PSYCH!!! The house is in too bad of condition for the lender to do FHA, so you need to put down 20%. Oh? You don’t have $57,000 PLUS closing costs? Sorry! No house for you. Wait! Maybe this other lender can do it. (wait wait wait wait wait) OMG we got a loan! Can we finally close already?!??

So when the phone rang and woke me up from my nap exactly 1 year ago today, I was a very happy and relieved girl. We hopped in the car and raced over to the lawyers office.

DSC_0314

Signed some papers and brought a really big check (although certainly nothing close to $57K).

DSC_0316

Yay!!!! We bought a house!

DSC_0327

This past year has been such a whirlwind and the spring was no exception. Spring 2010 was really, really hard. I’m sure most have thought BCL was all but abandoned, as the tumbleweeds have been rolling around here for the better part of 3 months. But it’s not.

Brick City Love is still alive – starting today.

Thank you Rob, for writing all those beautiful posts. They meant the world to me. You are an amazing man and there is so much love in my heart for you. So. Much.

Thank you readers, for being patient and sharing the journey. Your comments – especially the ones on Rob’s posts – have meant more than you could possibly know. I will keep blogging if you promise to keep reading and commenting. So tell your friends –

BRICK CITY LOVE IS BACK!!!!!

Happy 1st Birthday and here’s to making it to number 2.

Posted in general | 12 Comments

Blogging at Brooklyn Limestone

Today I’m guest blogging over at the always amazing Brooklyn Limestone! {WHAT?!? I KNOW!!!}

I love Stefanie, her house, & her blog. It’s beyond flattering to grace the pages of such a chic part of the internet. Thank you for having me!!!

Go check out my favorite nook and ogle her place.

Posted in bedrooms, bloggy, Inspiration | Tagged , , , , , , , , , , | 6 Comments

Remember the Details

Good morning friends. It’s been a week since I posted; the longest gap of time in the history of this blog. It feels like forever.

Things with the house have gone to the back burner while I finish my masters program. My final presentation is May 3rd. I logically realize it’s nearly a month away but it seems like it’s tomorrow and next year all at the same time. It’s an odd mental state to be in. I have to graduate {like “HAVE TO!!” have to}, so that’s where my attentions have been.

I hope to get at least a couple posts a week for the next month but 5 times a week probably isn’t realistic. Please bear with me. Deal?

So how was your holiday? Ours was lovely. We spent Easter with both our families. I won’t go into all the boring personal deets but do want to share one photo.

When I look at rooms, I notice the details. Yes, a room is about the whole thing working together but it’s also about those special details. The items people choose to display, the stories that must go with them. It isn’t any wonder that detail photographs usually rank among my favorite. The one above was taken yesterday.

We were dying Easter eggs so clear plastic protected the tablecloth. The sunlight was filtering in from the skylight at the left end of the room, washing up toward this end of the table.

This is my grandfather – PopPop – stirring my Grammy’s coffee in her mug.

She always has the same shaped mug, although the design sometimes changes. Pop’s mug is the one that says “RELAX”. He has used that mug as far back as I can remember. I never remember him having coffee at my parents house in any other mug – ever! Both sit in the mug cabinet at my parent’s house but are used only by them. That’s PopPop’s mug and always will be.

What touches me most – besides that nostalgic piece of ceramic – is Pop’s hands. The way he is stirring her coffee, making sure it’s just the way Gram likes it.

My grandmother is a strong woman who grew up during the Depression (do that math!); a very resourceful, thrifty, intelligent, educated woman. And yet, Pop has always fixed her coffee for her. A simple yet deeply meaningful act of service and love. It’s a detail I’ve noticed.

What do you notice around your friends & family? Do they always have to have the same mug? Or maybe your brother always gets the door for your mom? What special things do you notice about the people you love?

Posted in Non-house | Tagged , , , , , , | 6 Comments

How To: Diamond Tufted Headboard, Part 2

Last month, before I debuted our Master Bedroom, I showed you how I retrofitted my Craigslist headboard to be the frame I wanted.

I’m back to walk you through the rest of the tufting but I think we’re going to have to do this in two parts; construction & soft goods. The actual tufting is going to have to be a whole separate post to itself. So, lets start with the construction.

After making a bunch of sawdust, the headboard frame looked like this.

headboard finished frame

Now I needed to create an inset panel that would be the foundation for the tufting. That inset panel would get tufted and then slip into the frame. The frame & panel would get screwed together and we’d be good to go.

The Making of an Inset Panel

To keep things relatively light, I decided to use pegboard & 1×2’s to make my inset panel. The pegboard comes with a handy 1×1″ grid of holes, which I thought would keep my buttons lined up nicely.

First, I laid the headboard frame down on the pegboard and traced the shape of my inset panel.

DSC_0389

Then I roughly cut it out & laid out where the buttons would go with some chalk.

DSC_0394

Then, with a jigsaw, I cut out the rest of the pegboard. When you do this, be sure to cut on the INSIDE of the line. You want the inset panel to be slightly smaller than your frame. There needs to be room for the batting & fabric to wrap around the edges.

Obviously the pegboard itself is too flimsy & bendy {technical term} to support all this tufting, so we must make a frame.

To do this, attach 1×2’s around all the edges. With the 3 straight edges, this is relatively straight forward.

DSC_0414

DSC_0418

Attach the 1×2’s to the outermost edges. Where the frame curves in, cut along the pegboard with a jig saw. Like so –

The final support structure –

DSC_0422

Because I marked where the tufts should be on the front side of the panel, I needed to transfer those marks onto the backside of the panel.

DSC_0429

It would probably have just been easier to mark the tufts on the back side from the beginning. Live & learn.

DSC_0433

My easy-peasy solution was to tape screws into each hole. Then flip the panel over and mark the holes where the screws pop through with a sharpie.

DSC_0441

DSC_0442

Before we move on to soft goods, pre-drill the holes for attaching the inset panel to your frame. It’s easier to do this now, rather than after the panel is covered with foam, batting, & fabric.

DSC_0447

FINALLY! The foundation for my tufting was done. Lets move on to the foam foundation.

DSC_0547

Lay the panel on the foam and trace. I used 3″ foam but I think 2″ would have been just fine and cheaper too.

DSC_0555

Cut it out. An electric breadknife would really be the best tool to use to cut the foam.}

DSC_0570

It required a little piece together but it’ll all be covered in batting, so no one will ever know.

DSC_0573

Once your large piece of foam is cut out, mark where the buttons will go with a sharpie. Now grab your closet rod. Yup. Closet Rod.

DSC_0588

I chose one that was just as big as my button. With a twisting motion, drill out holes for each button.

DSC_0594

DSC_0603

DSC_0598

Once you’ve got all the holes punched out, adhere the foam to the panel (although, the batting will hold everything in place).

DSC_0619

Cover in batting and staple that to your 1×2 frame.

DSC_0630

Now go take a nap. Part 3 is where the fun begins.

Posted in 3rd floor, bedrooms, crafty, How To | Tagged , , , , , , , , , , , , | 20 Comments