
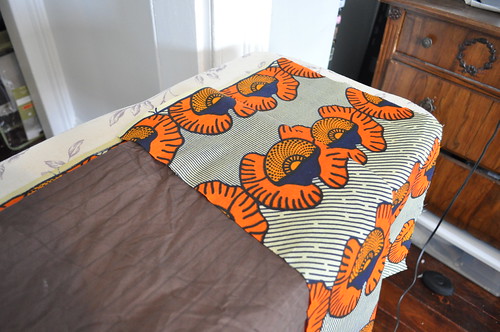
As I mentioned yesterday, I made 4 pillowcases for our Master Bedroom redo. Yesterday’s pattern worked great with a single yard of fabric but every fabric’s different.
My other fabric had these long stripes of flower. I wanted the pattern to wrap around the short end of the pillow, so I cut my 2 yards of fabric lengthwise {instead of in 1 yard pieces like Version 1}.

1. Start with your long strip of fabric that’s been ironed nice & flat.

Sometimes it’s easiest if you use a pre-made pillowcase as a template.

Fold the ends up about 6″ and iron in a crease.

On both ends, fold the raw edge over about 1″ and then under itself 1/2″ to finish it.


Stitch the edges folded edges.

2. This pillow will also have a pocket, so only sew in the big 6″ edge on 1 end.
{“What pocket?!” you’re asking. The one that folds over the end of the pillow to 1) hide it & 2) keep it from falling out.}

3. Then fold in half {right sides together} and stitch down the sides.

Turn right side out & you’re done!


Super simple!
Make anything fun recently?


So clever!! Nice touch with the pocket to both hide and secure the pillow!!
So which tutorial do you prefer? I’m thinking I kind of dig this one. The pocket is great. I’ve never seen that on a homemade pillow before. You are just impressing me left and right, Ms. Carrie! What’s next?
Thanks!! 😀
Honestly I think it depends on your fabric, specifically which way the print is. They’re both easy. If I wanted the print to wrap around the long edge, so there wasn’t a seam showing when you looked at the bed, I’d probably use version 1. If I wanted the print to wrap around the short end, I’d use version 2.
Adorable fabrics! So vibrant and fun. I really want to re-learn how to sew and start making my own pillowcases. I’ll have to save this post!
Cool fabric. Looks like an ethnic African fabric, but you used it in a different way. Very creative.
That’s exactly what it is, Cherry!! I found both at our neighborhood fabric shop (Halsey St. Fabrics).
I know it’s been over 2 years, but perhaps this post could use a bit more clarity for us beginners out there who’ve been told to make a pillow case as one of our first projects?
Por Ejemplo: Stitch the edges folded edges….I think you added a word 🙂
Then, “On both ends, fold the raw edge over about 1″ and then under itself 1/2″ to finish it.” There are two “ends” to this project and I honestly thought the previously folded over ends, not the edges. Maybe a change of wording to something like short edge vs long edge? We’ve all been there, right?! It’s not all just a blonde moment,…right?!?! Ah if you can’t laugh at yourself, who will?