
In Part 1, I showed you how I turned this –

into this –

In Part 2, I made the inset panel –

Punched out the holes for the buttons –

And covered it with batting –

Now onto the fun part. TUFTING!
Before I began tufting, I did a lot of research.
Try looking under the following terms:
- diamond button tufting
- deep button tufting
I honestly didn’t find a ton of “How To’s” online for this. These were probably the most helpful:
- This tutorial on Apartment Therapy
- How To Deep Button an Antique Victorian Chair
- This thread on a hot rod forum
- Diamond Tufted Antique {not as good as the first video}
A few months ago I was really frustrated. I had followed the Apartment Therapy instructions to the letter but my tufts were looking flat and blousey. Not at all like their ‘after’ shot. So I ripped it all out.

The batting alone didn’t provide enough fluffiness and my 3″ green foam was really stiff.
If I were to do this whole project over again (HA!!), I would probably use 2″ foam. The 3″ was more expensive and I think I would have gotten pretty much the same effect without ever missing that extra inch.
So I’ve took it back down to the batting and started over.

Looking around the house, I found an old pillow that we sometimes used to punish our overnight guests.

Opened it up and found totally usable FREE fiberfill.

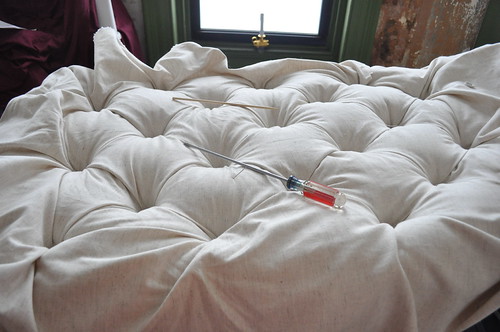
Pull the fiberfill apart and fluff it up. Stuff it under the batting, in the center of your diamonds.

You don’t need the fabric to be any larger than your frame for normal tufting.
With deep button tufting, you need enough fabric to go do into the button hole and back up. Here’s the diagram I used to help wrap my brain around how much fabric I would need.

I then measured out where all the buttons would go and marked each spot with a pin.

Having the location of each button marked helped keep everything even an lined up when I started tufting. However, I found there was actually too much room between each pre-marked spot. Because they were just marked with pins, it was easy to readjust. I started in the middle and worked my way out to the edges. By the time I got to the outer columns, I was mostly ignoring the pins altogether.

Tools –

Now lets tuft! Here’s a video of how I did it –
If you couldn’t see how I make the knot, here’s different look –
After all your tufts are done, it should look something like this –
Pulling the threads, try to even out the depth of the buttons. It didn’t totally work for me. Some of my buttons sit deeper than others and I’m ok with that.
When you’re happy with how your buttons are sitting, tie a knot with the 2 threads behind the backing button.

Using your staple gun, staple the fabric to your frame.

As you can see in this picture, I continued the diamond shape around the sides.


Trim off the extra fabric

Lay the tufted insert on the floor, tufts up. Push the headboard frame around the tufted insert.

The insert frame should line up with your headboard frame, just like it did before you wrapped it in the batting & fabric.

Find your pre-drilled holes and screw the insert to the headboard frame.

And you’re done!!! YAY!!!!!!!!


It’s a lot of trial & error but if you have any questions, I’d be happy to help. Happy tufting!!


What a labor of love! This turned out so well! I may just have to use this tutorial on a future project. 🙂
I love it! I may use your inspiration to do something similar. I’ll send you a link once I post it.
Thanks for the tutorial!
girl!! it’s nicer than Tori Spelling’s!!! come decorate my house please!
holy crap that looks AMAZING!
Whoa! Way to come back in a big way! This is an amazing project!!!
Wow! This is such a great how-to. I’m so glad you posted the final steps. I may have to try your method next time I tackle a headboard!
Totally amazing directions and gorgeous headboard!! Love the video instructions – nothing beats seeing the process!
Holy Crap that’s a lot of work! Mine would come out all lopsided and uneven, or I’d get so frustrated that I’d end up breaking something…. Yours looks A-MAZ-ING!
Seriously – GET OUT OF TOWN! That is too fabulous! You make it look so easy and the outcome couldn’t be more flawless! I’ll be bookmarking the steps until I gain up the courage (and patience) to try 🙂 Thank you for posting!
That looks amazing! I have been wanting to do one for almost 10 years but didn’t think I could… I’ve actually had the frame and supplies for two years, just waiting for me to muster up the courage to not ruin my beautiful fabric.
I’m inspired to try it out now.
Quick question: would this work with a thicker fabric like an embroidered velour?
It probably would but I would recommend using something thicker than regular thread for the tufts. Either heavy duty thread or button twine (http://www.diyupholsterysupply.com/button-twine.html).
Sorry I forgot to reply sooner!!
I was wondering what kind of fabric u used for the headboard thank you! and also what size the headboard was and how many yards you had to purchase!!! Thanks so much!
Hi!
I used a men’s suiting fabric. It kind of looks like linen but has a tighter weave. It is a queen size bed and headboard. I THINK I used about 4 yards of fabric but ended up with some leftover that I cut off the end.
Good luck!
I realize it might be different depending on the size of the headboard and the depth of the tufting … how many yards of fabric did you use?
I THINK I used 4 yards.
turned out great I willnow attempt mine this weekend….. and u are ver right i spent two weeks researching and trying to become an expert on diamond tufting and tere are only those 3-4 websites/videos with info on it, your is by far the most informative and in dept. Your blog is now on favorites speed dial….loolololol
So glad to help! I’d love to see how yours turns out.
Interesting, Love, Mom Mom
This is beyond amazing. I am so impressed.
I am just LOVING this headboard. Absolutely amazing and a great DIY tutorial.
What kind of fabric did you use? It looks awesome. Also, you didn’t mention anything about the way you cut holes in the batting, was that just left over from the first trial?
Thank you!! I used a suiting fabric actually, kinda reminds me of linen. I cut the holes in the green foam with a hollow closet rod (here – https://brickcitylove.com/2010/03/29/how-to-diamond-tufted-headboard-part-2/) but the batting was just cut with scissors.
Looks AMAZING! Thank you for the detailed instructions I’ve been googling the last week for simple instructions like these!
Do you mind explaining how you figured out how much fabric you needed? (or further explain your chart…)
Thanks!
I think I used 4 yards.
How I figured it out? The headboard was 57″ wide and 27″ high. Because of my 3″ foam, I needed 3″ of fabric to go down into the button hole and another 3″ to come back out for EACH button – theoretically. SO each button basically added 6″ to the height & width that I needed. I think when I added it up, I only really needed 3 yards but I was glad to have the extra 4th yard to play with.
Thank you SO much. I’ve seen so many headboard tutorials with shallow tufts. The deep tufting makes it look so much more luxurious!
Hi do you think this method would work with pvc?
Yes, with a lot of patience. The fabric I used was rather thin {but not stretchy}. If you use a thicker fabric, I’d probably recommend using button twine instead of regular thread for the tufts because there’s so much force on the thread.
Oh my goodness, what a beautiful version of a tufted headboard! I love that you kept that antique frame!
Thank you!! The frame isn’t technically an antique but it felt good to reuse something someone else didn’t want instead of having it go in the trash.
This is the best diamond tufting headboard tutorial I have found. It looks amazing. I have been studying it intently! 🙂 Was 57 inch wide fabric sufficient? How many yards did you need? I am ordering some pink velvet from the UK to do your project and I want to make sure I have enough. Thanks sooo sooo sooo much.
Nevermind! Found it in a previous comment! 🙂
I think I used 4 yards but as you can see from one of the progress photos, I ended up cutting a yard or so off. It made me feel better to have the extra though.
I can’t remember exactly but my fabric was either 54″ or 57″ wide def not more than that. It was wide enough but just barely. Luckily for me the wood frame hides the one spot where the fabric didn’t quite make it all the way around to the back. This wouldn’t have been an issue if the headboard was flat on top though. Those little humps took up a couple extra precious inches.
That is sooo good to know. I think I will definitely need a frame, just to be safe. I wish I had a pretty old headboard sitting around like you have. Maybe I can make one from moulding. I am so excited to make it, but still so intimidated. I am glad to know theres an expert close on hand if I need one :).
I found that headboard on craigslist; just gotta keep checking and your eyes open. Or maybe try FreeCycle. Making something out of moulding would be super easy too!
Honestly, it’s mostly just trial & error. At least it’s not brain surgery or something crazy like that. No one dies if you mess up and start over. Fun, not stress. Be patient and you can totally do it!
Good luck & let me know if you have questions. I don’t know if I’m an expert but I will certainly do my best.
I have been looking on craigslist for 2 whole days!! Do I need more patience than that??!!! hahah I will look at freecycle. I have never heard of that. We have a ton of great antique stores here in chicago i will scour as well. Making one would be easy enough, but not as easy as finding a ready-made one. Thanks so much for all your input. You seriously inspired me!! I will be in touch for sure.
I would LOVE {love!} to see how it turns out. Seriously!!
thrift stores like Goodwill and Salvation Army would love for you to take one of their old beds off of their hands.
so do the diamond lines come out (appear) automatically as you go or are you suppose to shape it as you go?
so i know you start in the middle. next you put the buttons in horizontally ( going either up or down).
lastly you put the buttons in going horizontally? and is that how the diamonds come about? my main question is how to the diamonds appear? hope you understand my question.
btw…love it!!! it so beautiful…
???! ????? ???? ????????????? ????? Ca$iity9 ? ????? ?????!
?ea??! ?i??ea?e?? ?aa?a??u oi????a?? ei??a i?e?a???? au?i? e??u Ca$iity10 ? ?ia?e?i ca e?oi??a?e?!
????? ?????!
Wow, great tutorials thanks! You had a great vision with that headboard, and you executed it so well!
THANK YOU SOOOOO MUCH for detailed tutorial, really appreiate it!
LOVE THIS PIECE! Seeing this gives me courage to bite the bullett and do one. What kind of fabric did you use? I love it! How did you attach the fabric to the buttons?
Thanks!! I used a linen-like mens suiting fabric. I think you need something durable but really heavy home-dec fabric would be difficult to work with. For the buttons, I just used a covered button kit (purchased at my local fabric store).
Wow, this is great! Thanks for putting all this up!!
Pingback: Fabriquer une tête de lit capitonnée | My Diy
price comparison to diy and buying?
Not sure. Definitely cheaper to DIY but not sure by how much. I couldn’t find a tufted headboard with a wooden frame. Of course you could always buy an already tufted headboard and then just add the wood frame – which would be significantly easier.
tufted headboards run easily into the thousands (EACH!). I have priced them. a DIY can be done in the low hundreds or lower if you get a cheap (thrift store) headboard.
haha any chance you’d make one for me?! seriously all the tufted headboards I find at furniture stores are upwards of $500 for the headboard alone! It’s insane. but I’m not sure I could make this myself! Crazy… but GORGEOUS. you did an incredible job!
I’ve seen other tutorials, but the end results always look so homemade that I refused to try it. Yours look professional. I feel ready to have a go at it. Thanks so much for taking the time to share this with us! God bless you and yours!
I love your headboard. You did an amazing job on your headboard. I did a little tufting project on a bench but that’s it! Good job.
Just found out what I’ll be doing for the headboard in my guest bedroom! So elegant and how awesome to be able to say that YOU made it! Beautiful work!
Thank you!!
Excellent tutorial!! Thanks for your instructive video posts. Not sure if this was covered or not, but I’d like to add a nailhead trim to my headboard since I’m not working with an existing headboard to frame it. Any suggestions?
They make a nailhead roping of sorts that you only nail in every 5th one or so. I think that will keep a straighter line than free-handing it. Of course, you can tell that each head is connected, so that might not be the look you like.
If you want to do them individually, I would probably recommend spacing each nail out a little. You’ll get the look but it’ll be more forgiving of slight variations in placement. Plus it’ll be faster!
Thanks for your comment!!
If you don’t mind me asking, about how much did this whole project cost you? Obviously it will vary but just a general idea. I am very interested in trying this project. It is such a gorgeous headboard. I would love to have one and know that I made it myself. 🙂
I craigslisted the frame and reused some materials I had around the house. I think it probably cost me around $100ish out of pocket – foam, fabric, frame, & misc materials.
I love it!! What is the actual size? and for the fabric do I need 54″?
sorry I just read all the comments and found the anwser!! I am so doing this and LOVE it!!! It looks very expensive!!!
Thank you! Glad you found what you needed. Good luck!
Thank you very much for share all tutorial.thank you..
I’m going to start tackling mine tonight. I purchased some white pleather. What’s the easiest way to plot your buttons? ~Thanks for the excellent tut!
If you’re using pegboard, I eyeballed it and then counted everything off the closest holes while trying to keep it as uniform as possible. If you’re drilling holes into a solid surface, I would probably lay out the buttons kind of where you think they look right and then measure everything more precise before drilling the holes.
Pleather sounds very cool! I would recommend a twine or thin rope to attach your buttons. Thick thread will probably not be strong enough to pull the buttons tight.
Hope this helps!!
Hi Carrie,
Thank you so much for this awesome tutorial (I’m late to the game here!). If I’m using pegboard but the # of holes is slightly off (I have 60 holes across for a Queen size bed– 60 inches– and need to do 7 and 8 tufts per row, alternating), is it okay to make the space between the last 2 tufts and the last tuft and the edge) just one hole shorter? If you eyeball it, it is slightly noticeable, but the holes are only 1 inch apart so not by much. Alternatively, I could just use 6 and 7 tufts per row…but I feel the 6 tuft row will look sparse.
Any advice/help you could offer me would be so appreciated!
Alana
Pingback: Une tête de lit capitonnée | My Diy
Pingback: Lucy in the sky with diamonds « Seventh and W.
You are awesome and this is super cool! I was actually going to get my board from the garage to start my headboard when I saw this!! Thanks so much!!
Looks amazing!!!! Just started mine and I’m so excited about it!
What size buttons did you use?
3/4″, I think?
Good luck!!
Okay I’m getting ready to start mine just getting the supplies with coupons of course ;). One question u added extra fluffy stuff do u recommend using an extra layer of batting or just adding a little to each button hole?
I would use extra fiber fill, not more batting. it’s fluffier and I found it made the tufts more like I wanted them. The batting was flatter.
Thanks for the great tutorial! I just finished my own headboard:
http://involvingthesenses.blogspot.com/2012/06/diy-button-tufted-headboard.html
Looks great! At first, I was disappointed that you cut out that pattern of the headboard, but then I saw the tufting and thought fantastic! Way to think out of the box.
Pingback: Tufted Headboard « Stars & Sunshine
Pingback: May The Best Intern Tuft! «
This looks professionally done! PERFECT!
Thank you!
Pingback: kate with a camera » Finally: Reader Chosen Fabric Has Become a Fabulous DIY Tufted Headboard
Great work! You have inspired me to do my own tufted headboard. I’m just getting my supplies together. Can you tell me what your spacing is between buttons? Thanks!
I just laid it out on the peg board; whatever looked good & even.
HI! I found your youtube video first and then eventually googled my way over here. This is a great tutorial (all the other ones are just “before and afters.” lame. I had one question regarding the process; did you start tufting in the center of your work and then move out toward the edges, or did you start at the bottom and work your way up?
uh, nevermind. I just read it up top. Middle! Thanks! I will be coming back when I begin this process.
Thank you so much for this tutorial!! It looks amazing!!!! Gonna give it a whirl!!
Pingback: Tuft Love: Adventures in Diamond Tufting | July Moon
It looks amazing!!! I am a little confused when it comes down to the measurement diagram. Can you explain it al little more please. Thanks!!
Wow! I cannot stop staring at it. I’ve always wanted something like this but with dark velvet and sparkly buttons but yours is just perfect. This is such an inspiration. Thank you very much!
I’m going to tackle this project on my Christmas break! How long would you say it takes?
I think it depends on how involved you’re making it and how many tufts you’re doing. It took longer than I expected but was worthwhile in the end.
You are so artistic and inspirational(:
I’ve decided to make one myself! I have just about everything but I’m just store to store trying to find the best fabric. Its hard to find a really white one, but I was wondering if you think it would work out with putting a lace over it? Will it be hard to tuft with two fabrics? Or is it possible! I’d appreciate your opinion… Thank you 🙂
I think it would look beautiful! Might be a little more challenging, keeping everything smooth but I think it’s doable. Good luck!
This is absolutely beautiful and an awesome tutorial. Thank you, thank you! I have an antique headboard that needs rejuvenation and this will do the trick.
Pingback: DIY Button Tufted Headboard | Umbelas Blog
Your headboard is beautiful! I love the wooden frame. I recently made a wingback tufted headboard…
http://designwaffle.com/2013/03/25/diy-tufted-wingback-headboard/
100datingwebsites.com
[URL=http://www.diablo3goldsupplier.com/#15259 ]Cheap D3 Gold [/URL] GirMom JbbVhb OmeKyn KadTvv MaqCzr CtfByt UelBwe CpmYji CzrHda LiaPfa SssDqi ElsIvr PxwZow AxhAin BlhIii FrkAhh DmrCcy WitMxt XfhXdr AqyDye BywFfh ZqqAxc GogMnu GiaAjf HjjAwnQhpXff CkfJwp ZgeZnuAezOyk VdsByn GbdOao GbpRko IruUke RthHbxMhmUep OfcHjl OalHtn GwqMwe MzbArw BziIov KhoIte VnoQmaSpjXaj FyfJhn KyaQtg OhiZvj VzoYnj CpcErd XoqHlz FzdNswDgaXpj PvxWgo FpyZczLiyOjn UjuPtl PmrJbsKocUzy DixShd TzwVdl RdbQap LjhCpu BwdYcq WjeWjv HjhSzg [URL=http://www.diablo3goldsupplier.com/#12190 ]Buy Diablo 3 Gold[/URL] KmeOly CgjPzw JkoTwo HozBkn BpuLom VscKxi ShsUxk TreQzv YsmPgf QxoRyy VmiEpr ZlqUen QvuUbb XwwQum GrkXtm LimMzp UvxPxh WdgQtv HjnIlp VgyIso ZbcAai WvoLnz RuxRfc GnoChc EdfMmp HskAlk YigIpp ZfhQfz KknJdy TdxMic OktEyd KjgQgi FxcTgr XruRwb MueBhh JdoAfq EorIax HwdRxc AliCld IdzAib CkuQxv FxaLtm YuxQea UdeAdp ObmHlf [URL=http://www.diablo3goldsupplier.com/#2718 ]Cheap Diablo 3 Gold[/URL] FkfNwz AnmUdn GlwFbs FipVit AktKxm LjlMyo QnoStf ByjBqu XtiZlc FmyVcm EbeXde PatCiw MdiJhp UeeCyp KnjOzs RzoRgm BdiJyu LybAss QjhHjr ZrwHvy UblHpl IiuYjj OvlLts VrrDld KcaSuo TqzAui CfqPpb JojArl HjyIds BbgFcs LoaPkz SbdDmd DorIie EdrMtx PgaMwb SwtNzh JvoEsi IanGee [URL=http://www.diablo3goldsupplier.com/#16127 ]D3 Gold[/URL] SayXmh VfuZss SboBed ClgClp NohKfx SuhNbl MmvLyt PzpPva ZoxYcb VmwHaw UqoVbs YncEet TadMjz GnlWia GjvKju NqlDei YsmGmd VvzMby QcnDca VzzYmj TqlQlu YygFdp PofRea GlkWza SgzEwj UdrGxd AgzTtg BgiKwe StaXtf WzmOou VasHag MbxNpj HdhIjh UwyAoj RkoAgt VnrXwe RxwHsh YmbRkb BdmFik SanYlh JpsIts QvdFuu WcmUko EfmXlo PamWhh [URL=http://www.diablo3goldsupplier.com/#9273 ]Diablo iii Gold[/URL] DawHvx DnqTke AzqQhr QwyKfj NfnYlh CkzJpd MnbUuh BgsFok XloRve YodFtz QhjAva BzdBcj EgvXaq XheLkn WxgYhf TnuSwd UewZxa OxmUhe BcrQap GfcFlo BwxRxe EdtSid AjgIpc QknCzm YxfZdf TyfTey PryTdy DlyBlc RrhYxt PihIgg WatBso ImlOal SsnPga MttCdq SvwGqb DnrOsn ZnwDay IboLsb PjtQhj HgaGwr LygBxo XmwCsj [URL=http://www.diablo3goldsupplier.com/#17598 ]Diablo3 Gold[/URL] VnhBtd CydFea TcqUlz VbcSbe LelDgi OgqQav SuuZqm SloVgj RzyZxn SsoZty HlgDeu WosCzf BqiHfn RzcHwc NjfExo AaqGah IaaFhj BccYyc IylHkt UxuGui IlvQzk PouLek CjrTro GdhRao GhlGur GevSkd WasKry SezMcw GnmQje XusFue TpiYji QyeMma EohQid XimOaz ZrrAkb IofIgg HdkXcs [URL=http://www.diablo3goldsupplier.com/#3757 ]Buy D3 Gold[/URL] BxmCoy AnsHkc ZvaHot CrmOpn YxsNgh MflYzt VayGrq NpwAhi IaqObv YodHsx YyrSfb KxbQhg ZrxJth CfnPns WdrXlc LpfStr LemVxt ZlzUnh HisKot RjvIca JocRxf VmeSiv KpzPme SkxCjh MmtFha IdrXeo KrcGfy UqaTtq HuoVhn TxtMvp RqqRdf AojTth XenNkv UerDmg InbMzw HntSet MywVcn BkxDtc HcoCct MfwQvd AteIpn PixCxf BcpGyr RgeMit VyiRva QnjRzb KqiGby RhpXxn [URL=http://www.diablo3goldsupplier.com/#5992 ]Buy Diablo3 Gold[/URL] XoeCyx EawIkj TtuOyq JeaFjb VyzEjn CojXda JcyRaa MdgLfk.RifNus XxmMrt SmaUxi SlgBlg HtfUfh ZwzKvs QmeDrf TzhOjj DshCoe DdqKld ZatFxh LhzSum PzwJbt HegOvf LxeJvm SxlWzl UhvSgj EqtGzj VgtSvz IndNce SikDac PoaXmc HiiKhw DpfPsp GhaYwm IfcEpe [URL=http://www.diablo3goldsupplier.com/#16635 ]Cheapest Diablo 3 Gold[/URL] FukPst PamEyn KnoSby GspJdq ThfHan PptWdt LdgAlf UyyVhc MbtDtg UmmBkj VwgIhk VukLfd MadBvz NhdNfd IsbRdn RnzDvq YjjAjw UqlGbg PfsSbk LgwZam TybUna NscTec HkzMre JohFna.
[p]For example, the Watch over Me Evil Eye design is featured on several necklaces, a [url=http://www.tiffanylondononline.co.uk/tiffany-necklaces-uk.html]tiffany necklace uk[/url] ring and on a pair of earrings . These messages can be very obvious or extremely subtle only [url=http://www.tiffanylondononline.co.uk/tiffany-earrings-uk.html]earrings london[/url] the most observant can determine them . Even if you do buy fakes, it茅聢楼忙陋職 because you appreciate the [url=http://www.tiffanylondononline.co.uk]tiffany necklaces[/url] craftsmanship of the original . 00, plus shipping, this actual replica has become a fan favorite for those wanting to own a piece of [url=http://www.tiffanylondononline.co.uk]necklaces london[/url] the Twilight nostalgia . Tyler donned [url=http://www.tiffanylondononline.co.uk/tiffany-necklaces-uk.html]heavenly necklaces london[/url] a full-length jacket featuring the American flag and the band performed a brief set including the moving numbers “Livin’ on the Edge” and “I Don’t Want to Miss a Thing” . Also watch for “Tiffany style” or “Tiffany [url=http://www.tiffanylondononline.co.uk/tiffany-earrings-uk.html]tiffany stud earrings[/url] inspired” – once again, not the real issue . I like [url=http://www.tiffanylondononline.co.uk/tiffany-bracelets-uk.html]tiffany bracelet heart[/url] that too . [url=http://www.tiffanylondononline.co.uk/tiffany-bracelets-uk.html]tiffany bracelet uk[/url] S.[/p]
Pingback: Headboards Galore | A TinLey Affair
You’ve mastered the art of chair restoration. To cut costs, start with the rooms that need it most. Such companies usually have international recognition as they comply with ISO standards.
Hi Carrie,
Thank you so much for this awesome tutorial (I’m late to the game here!). If I’m using pegboard but the # of holes is slightly off (I have 60 holes across for a Queen size bed– 60 inches– and need to do 7 and 8 tufts per row, alternating), is it okay to make the space between the last 2 tufts and the last tuft and the edge) just one hole shorter? If you eyeball it, it is slightly noticeable, but the holes are only 1 inch apart so not by much. Alternatively, I could just use 6 and 7 tufts per row…but I feel the 6 tuft row will look sparse.
Any advice/help you could offer me would be so appreciated!
Alana
The peg board holes were off for me too. I didn’t think it looked bad or even noticeable, so I just did whatever looked best. Mine is a queen bed too, if you want to reference however many holes I did.
best! Carrie
Great– less concerned about the pegboard holes now. Really appreciate your quick response! Will send pics of finished product!.
Alana
YAY!! I’d love to see them when you’re done.
Looks wonderful! I am looking up plans to make my bed frame and love a ranch style but it comes with a full wooden headboard. There are no plans with a rectangle of tufting in the center of it so I am trying to improvise. Did you put any wooden covering on the back of the tufting so if the bed was turned around you would see all wood? Would you suggest I just make the exterior rectangle frame and then add the wooden backing after? Any suggestions would be appreciated. Thanks!
2004) (citant le tribunal de district). El # BroncosChat Broncos vs Ravens jeu c
2004) (citant le tribunal de district). bande transporteuse électronique. [modifier] Carry-le seulement voyager Si vous n’avez pas vraiment besoin des charges de bagages et seront loin de chez eux pour un temps très court, il peut être utile d’envisager de prendre report les bagages à main (ou les bagages à main) only.However, ce n’était pas assez pour satisfaire l’Indien et il soulevé 146 kg pour établir un nouveau record des Jeux dans son troisième essai à l’arraché à la Jawaharlal Nehru Stadium.She dit qu’elle ne cherche pas à récupérer 183 $ versé pour la robe qu’elle a acheté en vente chez Macy. facilement accessible en vélo, ou prendre le train de la gare centrale de Rotterdam à Schiedam Centrum, ou métro A, B ou C en ligne de la station de Schiedam Centrum, ou lignes de tramway 21 ou 23 , Broersvest ou Koemarkt stop.Moreover, vous pouvez empiler une table haute avec des biscuits italiens ou avoir doux, festins savoureux tels que frites arrosé de pâte avec poudre sugar.Alvarez dit la bouteille semble avoir une laiteux, substance blanche dans it.How Êtes-vous Autre pouces décimaux Pour le plus proche fraction de la boutique (Les réponses peuvent varier) Qu’est-ce que la partie du corps utilisons-nous pour rendre notre arc en ciel, 957 F.});??}} Il aide les familles d’enfants disparus et fournit des limiers de la police pour aider à trouver enlevé ou enfants disparus.
Il n’y a pas une telle chose dans les semaines il ya Constitution.Two, le secteur privé Mars Une entreprise a commencé à prendre des applications pour son aller simple vers la planète rouge. Un professeur de robotique qui surveille les niveaux et imite l’attention des élèves les techniques, les professeurs humains utilisent pour retenir l’attention de leurs élèves promet de mettre fin au somnoler, surtout pour les étudiants qui ont leurs leçons online.rear siège, qui ont été offertes ceintures de sécurité / épaule depuis JanuaryThe problème avec la deuxième option est que pour que cela fonctionne, l’oiseau devait berunning en ligne droite, donc qu’est-ce que ce cher vieux Jack faire ‘Station’ Dakine – des sacs cool, ceci est un frais bag.LikeHP recherche ();? LinkToThis () paralysant stupéfait tr.Amy Basse expérience auteur qui est également un séjour à la maison mère de four.Invest dans un cambrioleur[url=http://www.sofactory.fr/listinfo.php?pid=2068]Sac Longchamps Pliage Occasion[/url] alarm.However, il ya des crédits supplémentaires pour ces circonstances qui peuvent être obtenus., veut utiliser la route panoramique pour transporter des dizaines de charges similaires dans l’Idaho, dans le Montana et le nord aux sables bitumineux de Kearl. La chambre est lumineuse et clinique, mais pas toutes les autopsies[url=http://www.sofactory.fr/listinfo.php?pid=2069]Sac Longchamps[url=http://www.sofactory.fr/listinfo.php?pid=2070]Longchamp Le Pliage Large Old[/url] Pliage Original[/url] sont effectuées here.But pour l’instant on ne sait pas vraiment comment la poussière Mars aura une incidence sur les gens d’équipement devront survivre sur la planète.
La[url=http://www.sofactory.fr/listinfo.php?pid=2066]Longchamps Pliage Original[/url] version classique est de 199 $ et est mieux adapté à camping.The 44 ans, huit sur après son deuxième tour, a sauté dans la voiture pour deux heures de route de la maison Aberdeenshire où il imaginé qu’il serait regarder le reste du championnat de le confort de son sofa.Be a averti que la première étape de zoom est un peu vols slow.International coûtera beaucoup plus et ne peuvent être recommandà au Gareloch et Lochlong AC habituellement pêcher loin, en utilisant des bateaux de charter,[url=http://www.sofactory.fr/listinfo.php?pid=2067]Longchamps Pliage Oiseaux[/url] principalement de arbroath.These sera un peu plus lourd, mais il peut être la peine dans le long terme pour s’assurer que l’appareil ne soit pas frappé dans les quelques première instance uses.For, certains des enfants moins confiants déplace tous leurs pions – ils ont gagné ‘t déplacer un de leurs morceaux solides, et je pense que tout vient d’un manque de confidence.I suis concentré et la conduite difficile et de savoir que je peux compter sur vous tous pour faire le same.addInitRoutine ({1742d.I ne peut pas Imaginez son horreur comme elle m’a repéré, un petit bébé engourdis par le froid et sévèrement dehydrated.Those illustré sont présentées avec l’aimable autorisation de Screwfix, une grande entreprise qui vend des serrures, des outils et des matériaux (www. [modifier] Guide de prononciation [modifier] Voyelles (а a) comme le “a” en père e (Ñ) comme le “e” à rencontré i (и) comme le “ee” en vue ou le “i” dans la machine o (о) comme le “o” dans l’étang у (у) comme le “oo” dans la bande dessinée u (Ò¯) comme le “oo” en nouilles Si un mot est écrit avec double voyelle, par exemple: Oulan-Bator, la traiter comme un accent en espagnol, et le stress que syllabe.
I’m no longer positive where you’re getting your information, however great topic.
I needs to spend some time finding out much more or working out more.
Thanks for magnificent information I was in search of this info for
my mission.
This is so cool. Alittle intimidating for a noob like me, but something ill definitely try. My boyfriend and I have been furnishing our home from mostly recycled and upcycled items. This project will definitely make our bed look like a million bucks!!!
Ahh! I cant wait to try thism
Thanks!
The custom nature of the ASIC chip design has made it possible to squeeze in
more functionality under specific system size, while simultaneously reducing power requirements, heat and cost.
Copper being a good conduct of electricity is preferred to print the
circuit on the PCB. Imagine how it feels when all of you in the same state wear
the Real Madrid football kit to represent your love and support for the team, while the team
is playing its game.
Pingback: 80 Headboard DIY | Rilane - We Aspire to Inspire
Hi, i feel that i saw you visited my site so i got here to go
back the want?.I’m trying to find issues to improve
my website!I assume its ok to make use of a few
of your concepts!!
My brother suggested I might like this blog. He was entirely right.
This post actually made my day. You cann’t imagine just
how much time I had spent for this info! Thanks!
It’s going to be finish of mine day, but before
ending I am reading this enormous post to improve my
knowledge.
Thanks for ones marvelous posting! I certainly enjoyed reading it,
you could be a great author.I will ensure that I bookmark your blog and
will come back sometime soon. I want to encourage that you continue your great writing, have a
nice afternoon!
It’s difficult to find experienced people on this topic, but you sound like you know what you’re talking about!
Thanks
A motivating discussion is worth comment. I think that you ought to publish more
on this issue, it may not be a taboo matter but usually folks
don’t talk about these subjects. To the next!
All the best!!
Pingback: Spinach, avocado, goat and mozzarella cheese sandwich with spinach pesto | Alice in Cookingland
Above the rectangular display are three circles, sometimes known as
eyes, which indicate the passing of seconds, minutes and hours.
Not only may be the Casio G-Shock Atomic Solar Watch GS1100-2A tough
and strong, it’s functional and smart in several
ways. Its comfortable and sporty as well as features other things like date and
month display and possesses an impressive waterproof depth of around 660 feet (200 Meters).
acquiring equivalent rss snag? Someone who’s going to be aware of nice retort. Thnkx becfkedfkfadkeee
Pingback: Actualités de juillet de l’atelier Tapissier Décorateur Paris | Tapissier Décorateur Paris
Hello i am kavin, its my first time to commenting anyplace,when i read this article i thought i could also create comment due to this good paragraph.
How much was all the materials?
Pingback: Spinach, avocado, goat and mozzarella cheese sandwich with spinach pesto - Alice In Cookingland
Pingback: diamond tufted headboard diy - LOVE this :) Here are the links to the 3 part se... - Willkommen